Saturday, December 18, 2010

Poached Pears with Ginger

Susanna Foo's Poached Pears

The five 3-course meals I prepared for The Gastronomer for her 2008 Christmas present were a hit, so I decided to repeat the gift for her birthday in 2010. This time, however, I vowed to be more adventurous in my recipe selection--venturing away from The America's Test Kitchen Family Cookbook in search of dishes that would challenge me and open up new frontiers in our kitchen. For the first menu, I returned to Susanna Foo Chinese Cuisine, which had been the inspiration for an excellent meal featuring a water chestnut salad and Mandarin pork wrapped in scallion crepes a few months before.

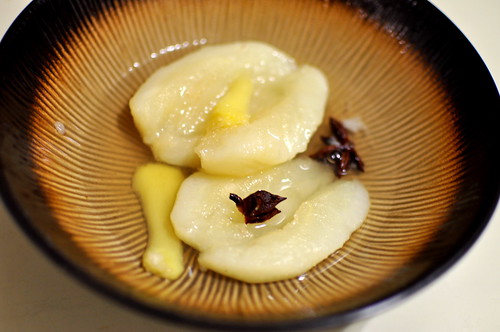
I usually write about the appetizer first, then the side dishes and entree, and finally dessert, but in this case I can't resist reversing the order, because this recipe is amazing. It's going straight to the Brightest Stars list--in the interval since we first tried these poached pears last March, I've made them at least four more times at The Gastronomer's request. In fact, I'm eating one right now for inspiration. They are truly a triumph in Asian fusion. I haven't tried any other poached pear recipes, but I can't imagine that they could compare without the ginger and star anise. Honestly, you don't even need the pears--at times when I've had some leftover white wine and ginger on hand I've seriously considered cooking up the sweetly spiced liquid to drink on its own. It's really amazing how the flavors of the cinnamon stick, ginger, lemon, and star anise become infused in the liquid when you boil it.

Recipe by Susanna Foo Chinese Cuisine.
  • 1 cup sugar
  • 3 cups water
  • 1 cup white wine
  • Juice of 1 lemon
  • 2 2-inch pieces of lemon zest
  • 1 4-inch cinnamon stick
  • 1 2-inch piece gingerroot, sliced (no need to peel it)
  • 2 star anise
  • 6 firm pears
Place the sugar, water, wine, lemon juice, lemon zest, cinnamon stick, gingerroot, and star anise in a saucepan just large enough to hold all of the pears in a single layer. Bring the liquid to a boil, stirring occasionally to dissolve the sugar, and cook for about 5 minutes to allow the spices to flavor the liquid.

Peel and core the pears. You can either leave them whole or cut them in half [or even quarters--which is much easier--if you don't mind sacrificing presentation]. Carefully place the pears in the boiling liquid, adding more water if necessary to cover them. Return the liquid to a boil. Cover the pan and reduce the heat to low. Simmer the pears until they are just tender, 10 to 20 minutes, depending on the ripeness of the pears [The Gastronomer and I have found that it can take up to 45 minutes if the pears are very hard, as is often the case when you purchase them from American supermarkets].

Using a slotted spoon, remove the pears from the liquid and set aside. Increase the heat to high and boil to reduce the liquid to about 2 cups. Strain the sauce, discarding the solids.

If serving hot, place the pears in individual serving dishes and spoon some sauce over each. If serving cold, place the pears in a bowl, pour the sauce over them, and refrigerate, covered.

Yield: 6 servings
Estimated Start-to-Finish Time: Not given
Actual Start-to-Finish Time: 1 hour 15 minutes
Substitutions: The Gastronomer has recently been requesting that I add far more than the suggested 2 pieces of lemon zest because she loves eating them after they have cooked with the poaching liquid. Feel free to do the same without fear that the pears will be overly sour--there's enough sugar in the recipe to balance out a lot of lemon flavor. We usually don't bother to reduce the liquid down to 2 cups--it's already sweet and flavorful enough, and it's nice to have more of it!
Friday, December 3, 2010

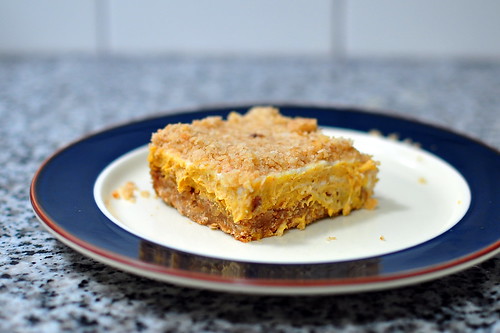
Pumpkin Cheesecake Crumble Squares

PUMPKIN CHEESECAKE CRUMBLE SQUARES

It's time to get excited for the third edition of the Eat My Blog charity bake sale, hosted by The Gastronomer and friends at Tender Greens in West Hollywood (Los Angeles) this Saturday. For the last bake sale in June, I contributed an old family favorite--applesauce spice cake. This time, I wanted to try something new and settled on these pumpkin cheesecake bars. Any recipe with "cheesecake" in the title has the potential to be tricky, so I did a practice run last week. I'm pleased to report that the crumble squares came out great--delicious enough to bring to Thanksgiving dinner with the in-laws.

Get there early on Saturday for the full selection of treats baked by ~70 LA food bloggers and chefs. This is no ordinary bake sale--expect a spread of truly creative, incredible desserts. All proceeds will be donated to the Los Angeles Regional Food Bank. Hope to see you there!

Recipe by Bon Appetit, October 2006, courtesy of Epicurious

For Crust
  • 1 cup all purpose flour
  • 3/4 cup (packed) golden brown sugar
  • 1/2 teaspoon salt
  • 1/2 cup (1 stick) chilled unsalted butter, diced
  • 1 cup pecan halves (about 4 ounces)
  • 3/4 cup old-fashioned oats
For Filling
  • 1 (8-ounce) package cream cheese, room temperature
  • 3/4 cup canned pure pumpkin
  • 1/2 cup sugar
  • 1 large egg
  • 1 1/2 teaspoons ground cinnamon
  • 1 teaspoon ground ginger
For Topping
  • 1 cup sour cream
  • 2 tablespoons sugar
  • 1/4 teaspoon vanilla extract
Make Crust

Preheat oven to 350°F. Generously butter 9x9x2-inch metal baking pan. Line rimmed baking sheet with parchment. Pulse first 4 ingredients in a processor until coarse meal forms. Add pecans; using on/off turns, process until nuts are chopped. Add oats; pulse until mixture is moistened but not clumping. Press 3 1/2 cups crumbs onto bottom of prepared square pan (do not clean processor). Transfer remaining crumbs to lined baking sheet. Bake crumbs on sheet until golden, stirring once, about 12 minutes. Cool crumbs. Bake crust until it is beginning to become golden, about 20-25 minutes. Remove from oven while preparing filling. Maintain oven temperature.

Add Filling

Blend all ingredients in the same food processor until smooth. Spread filling over warm crust; bake until set, dry in center, and beginning to rise at edges, about 20 minutes. Maintain oven temperature.

Add Topping

Mix all ingredients in a small bowl. Spread evenly over hot filling. Bake until topping sets and bubbles at edges, about 5 minutes. Cool completely in pan on rack. Sprinkle crumbs over topping; gently press into topping. Cover; chill until cold, about 2 hours. Can be made 2 days ahead. Keep chilled. Cut into squares.

Yield: 16 bars
Estimated Start-to-Finish Time: Not given
Actual Start-to-Finish Time: 1 hour 45 minutes
Substitutions: I used walnuts in place of pecans since we had a big bag on hand--this worked out fine. The original recipe said to bake the crust for 30 minutes before adding the filling, but I found that it was quite hard after 25 minutes (cutting the bars out of the pan was a bit difficult). Most user reviews on epicurious.com agreed that 30 minutes was too long.

Sunday, November 21, 2010

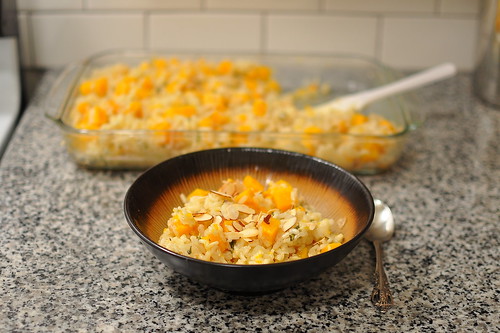
Baked Risotto with Butternut Squash and Sage

BAKED RISOTTO WITH BUTTERNUT SQUASH AND SAGE

Finding a use for leftover ingredients can be a constant struggle in cooking. No one wants to be wasteful, but what are we to do when parsley is only sold in massive bundles, buttermilk is hard to find in containers smaller than one quart, and a single butternut squash is just so bloody big? In our attempts to finish off large boxes of herbs and other such common leftovers, The Gastronomer and I typically find ourselves trekking back to the store for more ingredients to accompany them. This inevitably begets more leftover perishables, and the cycle continues.

This past week, however, the stars aligned for me. The week before we had made a recipe featuring the aforementioned butternut squash, and of course, half of the behemoth was still taking up space in our fridge. While searching through my favorite cookbook for a recipe to use it, I stumbled upon this baked risotto recipe. In addition to sounding delicious and requiring an appropriate portion of butternut squash, it called for fresh sage and chicken broth, both of which we had left over in abundance from The Gastronomer's recent pre-Thanksgiving cooking project. Furthermore, we had several large onions on hand, some leftover white wine, a bag of sliced almonds, just the right amount of Arborio rice, and a Tupperware full of recently-grated Parmesan cheese in the freezer. In a small household such as ours, this was really an astonishing series of coincidences. Clearly, the time was right for this recipe. The risotto turned out fantastic--I'd recommend it even if you don't fortuitously have every single ingredient on hand. Baking risotto is a neat trick to save yourself a half hour of stirring time at the stove while still achieving excellent results.

Recipe by The America's Test Kitchen Family Cookbook
  • 3 1/2 cups low-sodium chicken broth
  • 2 bay leaves
  • 4 tablespoons (1/2 stick) unsalted butter
  • 1 onion, minced
  • salt
  • 2 cups Arborio rice
  • 3 garlic cloves, minced
  • pinch of nutmeg
  • 1/2 cup dry white wine
  • 1 1/2 pounds butternut squash, peeled, seeded, and cut into 1/2-inch pieces
  • 3 teaspoons minced fresh sage
  • 3/4 cup sliced almonds
  • 2 ounces Parmesan cheese, grated (1 cup)
  • pepper
Adjust an over rack to the middle position and preheat the oven to 400 degrees. Bring the broth and bay leaves to a simmer in a medium saucepan over medium-high heat. When little bubbles being rising to the surface but the broth hasn't reached a boil, put a lid on the pan and turn down the heat to the lowest possible setting to keep the broth warm.

Meanwhile, melt the butter in a large saute pan over medium heat. Add the onion and 1/2 teaspoon salt and cook until lightly browned, about 9 minutes. Stir in the rice and cook until the edges begin to turn translucent, about 3 minutes. Stir in the garlic and sprinkle with a pinch of nutmeg, cooking for about 15 seconds, until the garlic is fragrant. Add the wine and cook, stirring frequently, until it is completely absorbed, about 2 minutes.

Spread the rice mixture into a 9 by 13-inch baking dish. Stir in the butternut squash and sage, and top with the warm broth. Bake until the squash and rice are tender and the liquid is absorbed, 30 to 35 minutes.

Place almond slices in a skillet and toast on the stove over medium heat until fragrant (about 5 minutes), shaking the skillet occasionally to prevent them from burning.

After removing the baking dish from the oven, stir in the Parmesan cheese. Season with salt and pepper to taste, and top each serving with toasted almonds.

Yield: 6-8 servings
Estimated Start-to-Finish time: 50 minutes
Actual Start-to-Finish time: 1 hour 15 minutes
Substitutions: The original recipe only called for 1 1/2 teaspoon minced sage, but I used over a tablespoon. The Gastronomer and I thought we could have used even more sage flavor. I didn't weigh the butternut squash but used the whole 1/2 squash that I had on hand. The original recipe listed 1/8 teaspoon saffron as a optional ingredient--I didn't have any and left it out. The extra complexity would have probably been missed more in the simpler variation on the recipe that didn't include squash, sage, and almonds.

Wednesday, October 27, 2010

Middle Eastern Lentil Soup

MIDDLE EASTERN LENTIL SOUP

For days when you feel like eating extra healthy, you really can't beat a lentil soup. Every 35 g serving of green lentils has 11 g of fiber, 10 g of protein, and no fat. Pretty incredible. I chose this recipe, courtesy of fatfreevegan.com, because of it contains a stellar array of spices---I always get excited about diving into our spice cabinet. When I first finished making it and dug into a bowl, I found it to be a bit unsatisfying; the total absence of sweetness or richness hit me harder than I had anticipated. However, it held up better the next day, when I wasn't so tired from cooking and in need of some truly hearty sustenance. It would make a meager entree, but as a side dish or replacing a salad before a meal, this soup is really quite delicious.

Recipe adapted from fatfreevegan.com
  • 2 cups chopped onion
  • 3 cloves garlic, minced
  • 2 zucchini, chopped in 1/4 - 1/2 inch pieces
  • Other vegetables such as eggplant, if desired
  • 5 1/2 cups water
  • 1/2 teaspoon coriander
  • 1/4 teaspoon cardamom
  • 1 teaspoon ground turmeric
  • 3/4 teaspoon ground cumin
  • 1/2 teaspoon ground ginger
  • 1/4 teaspoon freshly ground black pepper
  • 1/8 teaspoon cayenne pepper
  • 1 1/2 cups lentils
  • 2 tablespoons chopped fresh parsley (optional)
  • 3/4 teaspoon salt, or to taste
  • 1 tablespoon lemon juice or 1 teaspoon sumac
In a large pot, sauté the onion and garlic in 1/2 cup of the water for about 3 minutes. Add the zucchini and any additional vegetables and saute for 3 more minutes. Stir in the spices and cook for 1 minute. Add the lentils and the remaining water. Simmer the soup for about 30 minutes, or until the lentils are cooked (the time may depend on what kind of lentils you are using). Stir in the salt, and add the parsley. Just before serving, stir in the lemon juice or sprinkle each bowl of soup with a little sumac.

Yield: 4 servings
Estimated Start-to-Finish time: Not given
Actual Start-to-Finish time: 1 hour 5 minutes
Substitutions: The original recipe called for red lentils, but I couldn't find any so I used normal yellow/green ones, which are much more fibrous anyway. I didn't have any coriander or turmeric on hand, and I decided that purchasing one new spice for this simple weeknight recipe was enough. Deeming turmeric to be more important (if nothing else, the color of the dish would have been totally different without it), I left out the coriander. I added a bit of extra cumin to replace it. I took the easy way out and used lemon juice instead of sumac. If I make this again, I might try to find some---I'm curious what it's like.

Thursday, October 14, 2010

Lime Glazed Coconut Snowballs

LIME GLAZED COCONUT SNOWBALLS

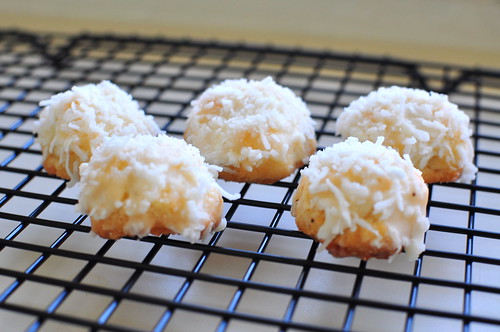
Long-time readers of Stellar Recipes may recall that back in November, I served The Gastronomer smoked salmon canapes, Castilian stew, and rosemary cream biscuits to cap off her 2008 Christmas present. You might have worried that this meal didn't include a sweet finish.... What kind of Christmas present makes the poor recipient forgo dessert? Well, never fear--dessert was indeed served, even if the corresponding blog entry has been a long time coming. These lime-glazed coconut snowballs were a fitting conclusion to a wintry feast.
The Gastronomer particularly loved the sugary lime glaze--fortunately, I had some extra left over for her to eat with a spoon.

Recipe by The America's Test Kitchen Family Cookbook
  • 2 1/2 cups all purpose flour
  • 3/4 cup superfine sugar (if you don't want to buy it, process regular granulated sugar in the food processor for 30 seconds)
  • 1/4 teaspoon salt
  • 2 sticks unsalted butter, cut into 1/2 inch pieces and softened
  • 3 tablespoons cream cheese, softened
  • 2 teaspoons vanilla extract
  • 3 tablespoons lime juice
  • 1 1/2 cups confectioners' sugar
  • 1 1/2 cups sweetened shredded coconut, chopped fine
Whisk the flour, sugar, and salt together in a bowl. Beat the butter into the flour mixture, one piece at a time, using an electric mixer on medium low speed, then continue to beat until the mixture looks crumbly and wet, 1 to 2 minutes. Beat in 2 tablespoons cream cheese and the vanilla until the dough just begins to form large clumps, about 30 seconds.

Knead the dough in the bowl by hand a few times until it forms a large, cohesive mass. Turn the dough out onto a clean counter, divide it in half, and pat into two 4-inch disks. Wrap the disks tightly in plastic wrap and refrigerate for 20-30 minutes.

While the dough is chilling, whisk 2 tablespoons of the lime juice and the remaining 1 tablespoon cream cheese together in a large bowl until smooth. Add the confectioners' sugar and whisk until smooth, adding the remaining lime juice as needed until the glaze is thin enough to spread easily. Adjust the oven racks to the upper- and lower-middle positions and heat the oven to 375 degrees.

Using your hands, roll the dough into 1-inch balls. Place the balls on parchment-lined baking sheets, spacing about 1 1/2 inches apart. Bake until the cookies are light golden brown, about 12 minutes, rotating and switching the baking sheets halfway through baking.

Let the cookies cool on the baking sheets for 3 minutes before transferring them to a wire rack to cool completely, about 30 minutes. Dip the tops the cookies into the glaze and scrape away any excess, then dip into the coconut. Set the cookies back on the wire rack and let stand until the glaze dries and sets, about 20 minutes.

Yield: 40 cookies
Estimated Start-to-Finish Time: 1 hour 40 minutes plus cooling time
Actual Start-to-Finish Time: 2 hours 30 minutes

Tuesday, June 29, 2010

Thyme Popovers

THYME POPOVERS

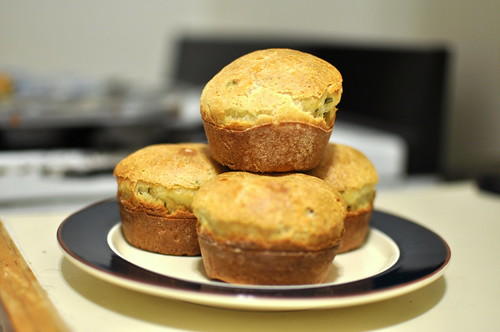
Popovers are pretty cool. Four simple ingredients, flour, butter, eggs, and milk, are transformed into magically airy treats that melt in your mouth like few bread products known to man. Add a bit of salt and minced herbs, and you have an irresistible snack. Even though it was 10:30 p.m. when these came out of the oven, The Gastronomer and I couldn't help eating three each.

Getting them to turn out right is a little tricky--it took me three tries to get satisfactory results, but even the "failures" tasted good. It's important to have the eggs and milk at room temperature before mixing in the flour, and the muffin tins must be coated with cooking spray and then dusted with flour or Parmesan cheese. The popovers' buoyant spirit is such that they try to climb right out of the pan as they cook, and if only cooking spray is used, they can slip and flip over on their sides, ultimately rising crooked. This happened to my first two batches; a dusting of flour on the third try seemed to anchor them enough that they could rise straight. Opening the oven door too early can also cause them to cave in. If you're hard core, there is such thing as a "popover pan", which really maximizes the rising effect.

Recipe adapted from Cooking Light, December 2008.
  • 1 cup all-purpose flour
  • 2 teaspoons minced fresh thyme
  • 1/2 teaspoon salt
  • 1 cup 2% milk
  • 2 large eggs
  • 1 tablespoon butter, melted
  • Cooking spray
Preheat oven to 375°. Combine milk and eggs in a medium bowl, stirring with a whisk until blended; let stand 30 minutes. Combine flour, thyme, and salt, stirring with a whisk. Gradually add flour mixture to milk mixture, stirring well with a whisk. Stir in melted butter.

3. Coat 8 popover cups or muffin tins with cooking spray, then dust them with flour. Divide batter evenly among the prepared tins. Bake at 375° for 30-35 minutes (40 minutes for popover cups) or until golden. Serve immediately.

Yield: 8 popovers
Estimated Start-to-Finish Time: Not given
Actual Start-to-Finish Time: 1 hour 15 minutes
Substitutions: The original recipe called for dusting the popover cups with grated parmesan cheese, and then preheating the cups in the oven for 5 minutes before filling them with batter. I originally guessed that the preheating was just intended to melt the cheese, but I've seen the technique described elsewhere, so there must be more to it than that. In any case, I didn't bother with preheating my muffin tin and my popovers turned out fine, but perhaps they could have been even fluffier. Dusting with flour instead was an idea that came from the popover recipe in my mom's classic Joy of Cooking.

Monday, June 21, 2010

Applesauce Spice Cake

APPLESAUCE SPICE CAKE

Growing up I didn't like icing, but that didn't stop me from loving cakes. When my birthday rolled around, I would always ask my mom to make one of my three favorites: cinnamon coffee cake, chocolate pound cake, or this applesauce spice cake. In recent years I have made it myself several times and gotten rave reviews from The Gastronomer. Thus it seemed like the perfect treat to bake for this past weekend's Eat My Blog charity bake sale. I have to admit that it didn't sell terribly well in the early stages of the bake sale, while competing with such visually arresting treats as Sleeping Baby Cupcakes and Peach Pie Lollipops, but I'd like to think that those who gave my cake a chance were pleased with their purchase. In any case, the bake sale was a tremendous success, raising over $5,400 for the Los Angeles Regional Food Bank, and The Gastronomer and I brought home a dazzling selection of treats baked by LA food bloggers and local restaurants.

The original recipe was called "Grandma Bess's Applesauce Cake", I believe. My mom found it in Joy of Cooking, or a similar classic cookbook.
  • 3 1/2 cups cake flour
  • 2 teaspoons baking soda
  • 1/2 teaspoon salt
  • 3 teaspoons cinnamon
  • 2 teaspoons allspice
  • 2 teaspoons nutmeg
  • 1/2 teaspoon cloves
  • 1 cup butter
  • 2 cups sugar
  • 2 eggs, beaten
  • 2 cups applesauce
Preheat oven to 350 degrees and grease and flour a tube or bundt pan. Sift together twice flour, soda, salt, and spices. In a large bowl, cream butter. Add sugar gradually and cream well. Add beaten eggs; mix well. Add flour mixture alternately with applesauce. Pour into pan and bake for about 1 hour 15 minutes, on until a tester comes out clean. Allow to cool a little before removing from pan.

Yield: ~16 servings
Estimated Start-to-Finish Time: Not given
Actual Start-to-Finish Time: 2 hours

Saturday, June 12, 2010

Seared Scallops with Bacon and Spinach

PAN-SEARED SCALLOPS WITH BACON AND SPINACH

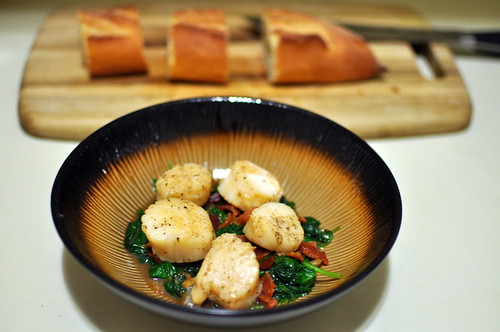
When it's not a special occasion, I typically shy away from buying scallops because they're so darn expensive. However, I recently decided to give Trader Joe's frozen New England wild jumbo scallops a try. They're relatively reasonably priced, and my understanding is that most "fresh" seafood sold in grocery stores has in fact already been frozen and defrosted, so I figured they might be just as good. I wasn't disappointed--these were comparable in flavor and tenderness to scallops I've had in restaurants, if not quite as enormous (one pound was about 18 scallops). I wasn't really able to achieve the intended crispy sear because the skillet filled up with liquid once I put the scallops in---it was like sauteing tofu. I should have pressed the scallops dry more aggressively before cooking, but I suspect that my real problem was not quite giving them enough time to fully defrost in the fridge before cooking. However, I avoided overcooking them (priority #1 when working with scallops or shrimp), and they were still a pleasure to eat atop the delicious bed of bacon-infused spinach.

Recipe by Cooking Light, May 2010
  • 3 center-cut bacon slices
  • 1 1/2 pounds jumbo sea scallops
  • 1/4 teaspoon plus 1/8 teaspoon kosher salt, divided
  • 1/4 teaspoon freshly ground black pepper, divided
  • 1 cup chopped onion
  • 6 garlic cloves, sliced
  • 12 ounces fresh baby spinach
  • 4 lemon wedges (optional)

Cook bacon in a large cast-iron skillet over medium-high heat until crisp. Remove bacon from pan, reserving 1 tablespoon drippings in pan; coarsely chop and set bacon aside. Increase heat to high.

Pat scallops dry with paper towels. Sprinkle scallops evenly with 1/4 teaspoon salt and 1/8 teaspoon pepper. Add scallops to drippings in pan; cook 2 1/2 minutes on each side or until done. Transfer to a plate; keep warm. Reduce heat to medium-high. Add onion and garlic to pan; sauté 3 minutes, stirring frequently. Add half of spinach; cook 1 minute, stirring frequently. Add remaining half of spinach; cook 2 minutes or just until wilted, stirring frequently. Remove from heat; stir in remaining 1/8 teaspoon salt and remaining 1/8 teaspoon pepper.

Divide spinach mixture among 4 plates; top each serving evenly with crumbled bacon and 3 scallops. Serve immediately with lemon wedges and a toasted baguette.

Yield: 4 servings
Estimated Start-to-Finish Time: Not given
Actual Start-to-Finish Time: 1 hour 15 minutes
Substitutions: I went ahead and left all of the bacon fat in the skillet while cooking the other ingredients. In keeping with their mission, Cooking Light tends to avoid using any fats, salts, etc. that aren't absolutely necessary, but I figured it couldn't hurt to have everything taste extra bacon-y.

Thursday, June 3, 2010

Strawberry Napoleons

ENGAGEMENT

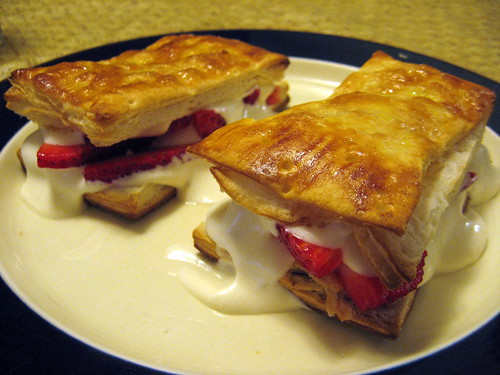
After the spaghetti and meatballs were gone, the engagement ring was still burning a hole in my pocket, but having missed my opportunity to carry out my planned proposal at the beginning of the meal, I had no choice but to carry on with dessert. These Napoleons were delicious but messy--the pudding and cream mixture wasn't thick enough to stay inside the "sandwiches", as can be seen in the photo.

Homemade vanilla pudding is a real treat--I never considered myself to be a pudding man, but this recipe is amazing. The Gastronomer enjoyed it as well, and she still didn't suspect a thing...

Recipe by The America's Test Kitchen Family Cookbook

Vanilla Pudding
  • 3/4 cup granulated sugar
  • 2 tablespoons cornstarch
  • 1/8 teaspoon salt
  • 3 1/2 cups half-and-half
  • 3 large egg yolks
  • 1 tablespoon unsalted butter
  • 1 tablespoon vanilla extract
Combine the sugar, cornstarch, and salt in a medium saucepan. Slowly whisk in the half-and-half and then the yolks. Bring the mixture to a simmer over medium-high heat, whisking constantly and scraping the bottom and sides of the pot. Reduce heat to medium and cook, stirring constantly, until the pudding is thick and coats the back of a spoon, 1 to 2 minutes.

Strain the pudding through a fine mesh strainer into a bowl. Stir the butter and vanilla into the pudding until the butter is melted. Press plastic wrap directly onto the pudding surface to prevent a skin from forming and refrigerate until set, about 3 hours.

Strawberry Napoleons
  • 1 (9 by 9 1/2 inch) sheet frozen puff pastry, thawed
  • 1 large egg, lightly beaten
  • 1/4 cup granulated sugar
  • 3/4 cup heavy cream, chilled
  • 1 1 /2 cups vanilla pudding
  • 1/2 teaspoon vanilla extract
  • 1 quart strawberries, hulled and sliced
  • confectioners' sugar for dusting
Preheat the oven to 425 degrees. Cut the puff pastry into 6 rectangles, transfer to a rimmed baking sheet, cover with plastic wrap, and refrigerate for 15 minutes.

Brush the rectangles with the beaten egg and sprinkle lightly with the granulated sugar. Bake until puffed and golden, about 15 minutes. Let the pastry rectangles cool for 15 minutes, then split them in half lengthwise using a serrated knife.

Whip the cream with an electric mixer set on low until frothy, about 1 minute. Increase the speed to high and continue to whip until smooth, thick, and doubled in volume, 1 to 3 minutes. Add the pudding and vanilla to the whipped cream and whip until stiff, about 1 minute. Spread 1/4 cup of the pudding mixture over the bottom of each pastry square, then top with 1/2 cup berries. Spoon another 1/4 cup of the pudding mixture over the berries.

Gently press the pastry tops onto the pudding mixture, then dust lightly with powdered sugar. Dollop the remaining pudding mixture attractively on top of each pastry before serving.

Yield: 6 servings
Estimated Start-to-Finish Time: 1 hour 30 minutes (not counting pudding chilling time)
Actual Start-to-Finish Time: 2 hours

Thursday, April 29, 2010

Spaghetti and Meatballs

ENGAGEMENT

It's been a very special week in the world of (G)astronomy. Thus the timing is right to share the dinner I made on the very ordinary Monday last March that I chose for my marriage proposal. It was a covert operation, so the meal couldn't be too extravagant--the shopping and cooking had to be done in a single day and be finished by 6:00 p.m. This was no easy task for a plodding cook like me. Nevertheless, I wanted to make something special. I started off with rosemary quick bread, a favorite from the early days of our relationship. For the entree, I settled on spaghetti and meatballs. I definitely wasn't going to trust just any cookbook for a recipe of such importance--it had to be America's Test Kitchen. As expected, the homemade tomato sauce was perfect, and the massive meatballs were delectable. I'd like to think that she would have said "yes" even if dinner hadn't been delicious, but I'll never know...

Recipe by The America's Test Kitchen Family Cookbook

Quick Tomato Sauce
  • 3 tablespoons extra-virgin olive oil
  • 3 garlic cloves, minced
  • 1 (28 oz) can crushed tomatoes
  • 1 (14.5 oz) can diced tomatoes
  • 3 tablespoons minced fresh basil
  • 1/4 teaspoon sugar
  • Salt
Cook the oil and garlic in a saucepan over medium heat until fragrant but not browned, about 2 minutes. Stir in the crushed and diced tomatoes with their juice. Bring to a simmer and cook until slightly thickened, 15 to 20 minutes.

Stir in the basil and sugar, and season with salt to taste.

Spaghetti and Meatballs
  • 2 slices high-quality white sandwich bread
  • 1/3 cup buttermilk (to substitute normal milk, mix in 1 teaspoon vinegar or lemon juice and let it stand for 5 minutes)
  • 3/4 pound (80% lean) ground beef
  • 1/4 pound ground pork
  • 1/4 cup grated Parmesan cheese, plus extra for serving
  • 2 tablespoons minced fresh parsley
  • 1 large egg yolk
  • 1 garlic clove, minced
  • Salt and pepper
  • Vegetable oil
  • 4 cups tomato sauce
  • 1 pound spaghetti
Cook spaghetti in a large pot of salted boiling water until al dente. While the water is boiling, begin to prepare the meatballs. Remove and discard the crusts from the bread, then tear it into small pieces. Pour the buttermilk over the bread crumbs in a large bowl and use a fork to mash the mixture into a smooth paste.

Add the beef, pork, Parmesan, parsley, yolk, garlic, 3/4 teaspoon salt, and 1/8 teaspoon pepper to the mashed bread. Stir the mixture gently until combined and uniform. Gently form the mixture into about twelve 1.5 inch diameter meatballs.

Pour the oil into a large skillet until it measures a depth of 1/4 inch. Heat over medium-high heat until shimmering. Add the meatballs in a single layer and cook until nicely browned on all sides, about 10 minutes. Transfer to a paper-towel-lined plate and discard the oil left in the skillet. Place the skillet with any browned bits over medium heat and add the tomato sauce. Bring to a simmer, scraping up any browned bits. Reduce the heat to low and add the meatballs. Continue to simmer, turning the meatballs occasionally, until heated through, about 5 minutes.

Drain the spaghetti, reserving 1/2 cup of cooking water, and return it to the pot. Stir in several large spoonfuls of the tomato sauce (without meatballs), and toss to coat. Divide the pasta among the individual bowls. Loosen the remaining sauce as needed with the reserved pasta cooking water, and top each bowl with the desired amount of sauce and several meatballs. Sprinkle with Parmesan and serve.

Yield: 4 servings
Estimated Start-to-Finish Time: 1 hour 10 minutes
Actual Start-to-Finish Time: 1 hour 30 minutes
Substitutions: I couldn't find ground pork, so I just used a full pound of ground beef. I also ended up using bucatini instead of spaghetti, because it was what we had on hand, and who doesn't like noodles that double as drinking straws!

Wednesday, March 31, 2010

Jamie Oliver's Curry with Tofu

JAMIE OLIVER'S CURRY WITH TOFU

While enjoying some R&R in our hotel room in Seattle during my spring break, The Gastronomer and I stumbled across a preview episode of the new show "Jamie Oliver's Food Revolution". Although I usually let The Gastronomer take care of the non-sports TV watching in our relationship, this show had me hooked right away. The basic premise is that British food network star Oliver is visiting public schools in the unhealthiest communities in the U.S. and trying to change the way they feed their kids. Apparently he has already led a successful campaign to completely overhaul the school lunch system in Britain--an impressive accomplishment for a TV chef. However, judging by the first episode, it's not going to be easy repeating the feat in the U.S. You could create a raucous drinking game out of watching the show with your friends and taking a shot every time he says "I think I'm going to cry."

Whether or not he can convince the kids in West Virginia that grilled chicken and fresh tomatoes are more delicious than pizza remains to be seen, but it's good to see a TV show that tries to change the world for the better but still manages to be entertaining. If things in fact continued to go poorly after his first week at the school, I feel like they'll rig the show somehow to make it seem like his efforts paid off. Nevertheless, I'm a little nervous for him.

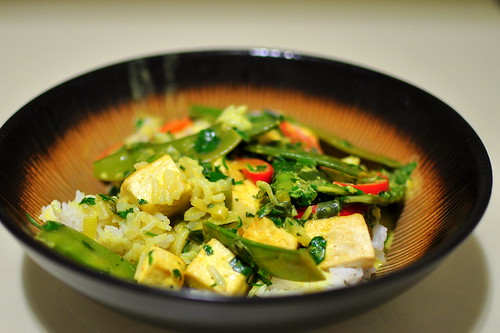
In any case, when The Gastronomer recently discovered the recipe below courtesy of La Fuji Mama, she knew it was perfect for me. I'm always on the lookout for new tofu recipes, I love curry, and the timing was right. I didn't love it quite as much as The Gastronomer's Vietnamese chicken curry, but it's definitely a winner as a delicious easy weeknight dinner. Just don't be deceived into thinking it's super healthy--coconut milk is some fatty stuff.

Recipe adapted from Jamie's Food Revolution via lafujimama.com
  • 3 tablespoons olive oil
  • 1 red bell pepper, julienned
  • 8 ounces snow peas, ends clipped
  • 2 tablespoons curry powder
  • 1 bunch scallions (about 7), finely chopped (you can use both the green and white parts)
  • 1 tablespoon butter
  • 2 cans (14-ounces each) coconut milk
  • 1/2 teaspoon salt
  • 1 bunch fresh cilantro, finely chopped
  • juice of 1 lemon
  • 1 1/2 teaspoons sesame oil
  • 15 ounces extra firm tofu, cut into 1-inch cubes
Press the tofu between paper towels to remove some of its moisture.

Meanwhile, heat the olive oil in a pan over medium heat. Add the bell pepper and cook for 2-3 minutes. Lower the heat slightly and add the scallions and snow peas, then stir in the curry powder. Cook for another minute, then add the butter and stir until it melts. Add the coconut milk. Bring everything to a boil, then turn the heat down and simmer for 2 minutes. Add 1/2 teaspoon of salt and stir in the cilantro and lemon juice. More salt can be added to taste at this point, but it will be particularly effective if sprinkled over each serving immediately before eating [a trick borrowed from The Gastronomer's grandmother].

In a skillet over medium-high heat, heat the sesame oil. When it is hot, add the tofu. Cook, stirring and turning the tofu occasionally, until it is browned on all sides. Turn off the heat and serve the tofu with the curry sauce over rice.

Yield: 4-6 servings
Estimated Start-to-Finish Time: Not given
Actual Start-to-Finish Time: 1 hour
Substitutions: At the Gastronomer's suggestion, I added some extra vegetables to La Fuji Mama's recipe. Incidentally, I don't imagine it'd be too noticeable if you left out the tablespoon of butter, for all you vegan chefs out there.

Friday, March 19, 2010

Rosemary Cream Biscuits

ROSEMARY CREAM BISCUIT

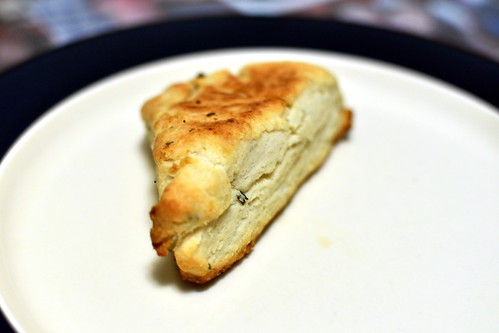
These are great biscuits--certainly not the healthiest bread product out there, but simple and just about perfect in taste and texture. They are extremely easy to make--the step that took me the longest was picking and cutting up the fresh rosemary.

The bottoms of the biscuits were browning a bit too fast, so I had to flip them over for the final five minutes of cooking. This led to a somewhat flattened appearance, but it was worth it to avoid a burnt layer.

Recipe by The America's Test Kitchen Family Cookbook
  • 2 cups all-purpose flour, plus extra for the counter
  • 2 teaspoons sugar
  • 2 teaspoons baking powder
  • 1/2 teaspoon salt
  • 2 tablespoons minced rosemary or other fresh herbs
  • 1 1/2 cups heavy cream
Line a baking sheet with parchment paper and preheat the oven to 450 degrees. Whisk the flour, sugar, baking powder, salt, and herbs together in a large bowl. Stir in the cream with a wooden spoon until the dough forms, about 30 seconds. Turn the dough out onto a lightly floured counter and gather into a ball. Knead briefly until smooth--avoid overworking the dough, as it will make the biscuits tough.

Pat the dough into a 3/4-inch-thick circle. Cut the biscuits into rounds using a 2 1/2-inch biscuit cutter of into 8 wedges using a knife. Place the biscuits on the parchment-lined baking sheet. Bake until golden brown, about 15 minutes.

Yield: 8 biscuits
Estimated Start-to-Finish Time: 30 minutes
Actual Start-to-Finish Time: 45 minutes
Substitutions: I found the dough to be extremely dry and crumbly, so I ended up adding an extra ~1/4 cup of cream.

Tuesday, March 16, 2010

Castilian Stew

CASTILIAN STEW

When I originally drew up the menus for The Gastronomer's 2008 Christmas present, I intended for the final meal to culminate with chicken cordon bleu. At the time, wrapping one meat in another seemed like an appealingly extravagant conclusion to my series of culinary efforts. However, I somehow managed to forget that chicken is The Gastronomer's least favorite animal to eat, and besides, maybe the venerable dish was never all that cool to begin with...

A substitution had to be made, and with the weather cooling down, this Spanish stew from the Barcelona Wine Bar and Restaurants cookbook seemed like an ideal choice. Despite my bastardization of the recipe (see below), it turned out really well. I served the stew with rosemary cream biscuits from the The America's Test Kitchen Family Cookbook.

Recipe by The Barcelona Cookbook
  • 1/2 pound ham, finely diced
  • 1/2 pound slab bacon, finely diced
  • 2 cups diced smoked Spanish chorizo sausage (about 4 links)
  • 1/2 cup olive oil
  • 1/4 cup chopped garlic (one whole head)
  • 1/4 cup chopped red bell pepper
  • 2 cups canned tomatoes, drained
  • 3 russet potatoes, peeled and diced (2 1/2 to 3 cups)
  • 5 to 6 cups chicken stock
  • Salt and pepper
  • 6 cups chopped escarole or a similar green such as chard or kale (about 1/2 pound)
In a large pot, cook the ham, bacon, chorizo, and olive oil over medium heat for 8 to 10 minutes. Add the garlic and red pepper and cook for 7 to 8 minutes longer.

With your hands, squeeze the tomatoes to break them up and expel their juices. Add them to the pot along with the potatoes and enough stock to cover. Bring to a simmer over medium heat and cook for about 15 minutes, or until the potatoes are tender. Season to taste with salt and pepper.

Push the greens into the soup and cook for about 10 minutes, until the greens wilt and the soup is piping hot. Taste for seasoning and serve.

Yield: 4 hearty servings
Estimated Start-to-Finish Time: Not given
Actual Start-to-Finish Time: 2 hours 15 minutes
Substitutions: I wasn't able to buy smoked chorizo, so I ended up using three links of our favorite Italian hot sausage from Trader Joe's. No doubt this changed the character of the soup a bit, but the flavors still melded nicely. I bought a large bunch of swiss chard, and even though it was probably 8-9 cups, I threw it all in because I didn't know what else I'd do with the leftovers. This worked out fine--the stew had more than enough flavor to keep the overabundance of greens from stealing the show.

Thursday, March 11, 2010

Smoked Salmon Canapes

SMOKED SALMON CANAPES

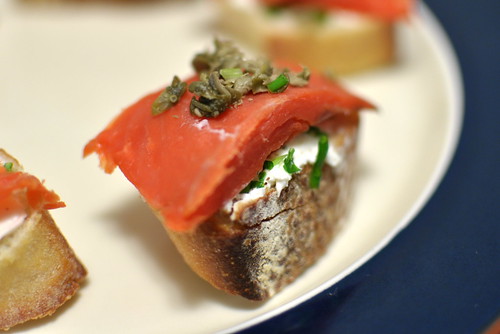
On November 21, 2009, nearly 11 full months after I pledged to make The Gastronomer 5 three-course meals as a Christmas present, I finally came through with the final feast. This one needed to be extra special, so I started off with one of her all-time favorite foods: smoked salmon. You might not guess it by looking at her, but she has a Jewish soul.

The accompaniments here are classic, and they work together beautifully. As I mentioned earlier, capers have been a revelation to me; they were the obvious choice among the optional ingredients. I could have been more of a champ and cured the salmon myself, but I stuck with the offerings from TJ's, which did the job quite nicely.

Recipe by The America's Test Kitchen Family Cookbook
  • 6 tablespoons cream cheese, softened
  • 16 slices cocktail-sized pumpernickel bread
  • 3 tablespoons minced fresh chives
  • Pepper
  • 8 counces sliced smoked salmon
  • 4 teaspoons minced red onion or shallot (optional)
  • 4 teaspoons capers, rinsed and coarsely chopped (optional)
  • 4 teaspoons minced fresh dill (optional)
Spread a light layer of cream cheese over each slice of bread. Sprinkle evenly with chives and pepper. Lay the salmon over the bread. Cut each piece in half along the diagonal. Garnish with the onions, capers, and dill (if using) before serving.

Yield: 8 servings
Estimated Start-to-Finish Time: 15 minutes
Actual Start-to-Finish Time: 30 minutes
Substitutions: I felt that capers plus chives provided plenty of flavor, so I skipped the onions and dill. I couldn't track down any pumpernickel bread, but a standard French baguette worked just fine.

Thursday, February 25, 2010

Grilled Shrimp with Peach Salsa

GRILLED SHRIMP WITH PEACH SALSA

When our Cooking Light magazine arrived last August with pictures of skewered shrimp on the cover and the headline, “Fire up the coals: Great ideas for grilling tonight", I felt inspired to break out the Smokey Joe and attempt my first grilled seafood and vegetables. The recipe for Fiery Grilled Peach and Habanero Salsa sounded particularly appealing, and although it was suggested as an accompaniment for grilled pork, chicken, or striped bass, I decided that shrimp were the way to go. The Gastronomer and I have been enamored with shrimp for quite some time—their ease of preparation and luxurious flavor and texture when cooked properly put them at the top of our list of weeknight dinner proteins.

I consulted my old friend The America's Test Kitchen Family Cookbook for tips on grilling the shrimp. The preparation was simple—I placed 5-6 shrimp on each skewer, brushed on vegetable oil and seasoned them with salt and pepper, and then grilled them for about 3 minutes on each side over a medium-hot fire. The peach salsa was a great compliment to the shrimp; we served them together over rice.

Recipe by Cooking Light, August 2009

Peach Habanero Salsa
  • 4 large peeled peaches, halved and pitted (about 1 pound)
  • 2 (1/4 inch thick) slices red onion
  • Cooking spray
  • 2 tablespoons chopped fresh cilantro
  • 1 tablespoon fresh lime juice
  • 1 teaspoon sugar
  • 1 teaspoon grated orange rind
  • 1 finely chopped seeded habanero pepper (about 2 teaspoons)
  • 1/2 teaspoon salt
Prepare grill to medium-high heat. Lightly coat peaches and onion with cooking spray. Place peaches and onion on grill rack coated with cooking spray; grill peaches 2 minutes on each side. Cool and chop peaches. Grill onion 3 minutes on each side. Cool and chop onion. Combine peaches, onion, cilantro, and remaining ingredients in a medium bowl; toss well. Let stand 15 minutes.

Yield: 15 servings
Estimated Start-to-Finish Time: Not given
Actual Start-to-Finish Time: 1 hour 30 minutes (this included preparing and grilling the shrimp)
Substitutions: The original recipe only called for 1 teaspoon of chopped habanero, but we found that it wasn't too crazy spicy even with twice this much. I left out the cilantro, because while the speckles of green make a dish's appearance more interesting, it doesn't do much for the taste, and it always seems like a waste to buy a big bunch and only use a couple of tablespoons.

Saturday, February 20, 2010

Scallion Crepes

SCALLION CREPES

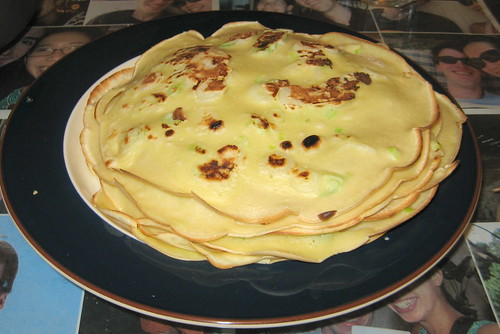
These crepes from Susanna Foo Chinese Cuisine go wonderfully with Mandarin Pork with Brandy-Infused Hoisin Sauce, and they’re hard to resist eating alone too! They have a nice soft texture, with excellent flavor enhanced by the salt and scallions. I found that it was hard to get both sides of the crepes to look nice and golden brown (the appearance might have been improved if I had chopped the scallions smaller so that the batter was less lumpy), but the taste was right on.

Recipe by Susanna Foo Chinese Cuisine
  • 1 ½ cups all-purpose flour
  • 1 ½ cups water
  • 4 large eggs
  • 1 tablespoon coarse or kosher salt
  • 1 cup finely chopped scallions
  • About ½ cup corn oil for frying
Combine the flour, water, eggs, and salt in a food processor and process until all the ingredients are thoroughly combined. Pour the batter into a medium bowl. Or to mix by hand, whisk the water and eggs together in a large bowl, add the flour and the salt, and mix well.

Add the scallions and mix thoroughly.

Heat 1 tablespoon of the oil over medium heat in an 8-inch nonstick skillet. When the oil is medium-hot, ladle ¼ cup of the batter into the skillet. Tilt the pan so that the batter spreads evenly. Cook until the crepe is golden brown, 2 to 3 minutes, then turn and brown on the second side, about 2 minutes. Transfer to a platter and repeat, using the remaining batter and oil as needed.

Serve warm; the crepes are best when freshly made.

Yield: 10-12 crepes
Estimated Start-to-Finish Time: Not given
Actual Start-to-Finish Time: 40 minutes
Substitutions: I used vegetable oil to fry the crepes, which worked fine.

Sunday, February 14, 2010

Chocolate Heart Layer Cake with Chocolate-Cinnamon Mousse

CHOCOLATE HEART LAYER CAKE WITH CHOCOLATE-CINNAMON MOUSSE

Four years ago at the beginning of February, The Gastronomer sent me an email asking, "Will you please make this cake for Valentine's Day?" She was totally kidding---the recipe was crazy complicated, involving repeated siftings, double boilers, overnight chilling, horizontal cake-cutting, alcohol and tea, mousse and ganache, and a strange baking container known as a "cake ring." I had baked a few cakes in my day, but this recipe was clearly way over my head. In the years that followed, we had a running joke about the heart cake being the most difficult recipe ever. Things got funnier in 2007, when a 12-year old had the audacity to post a review online saying that the recipe was easy. Talk about wounded pride...

After gaining experience and confidence in the kitchen over the past couple of years, I decided this would finally be the year that I tackled the challenge. A few weeks ago I purchased a heart-shaped cake ring and presented it to The Gastronomer on her birthday as a prequel to the Valentine's treat. I made the cake over a two-day period this weekend. The recipe was as complicated as it appeared, but the instructions were mostly quite clear, and while the end product wasn't as beautiful as it could have been (it's apparent that I need some more frosting practice), the flavor was excellent. The combination of chocolate, cherry jam, and chai spices works together really well.

I can assure you that if someone makes this cake for you, they probably love you a lot. Happy Valentine's Day, and chúc mừng năm mới!

Recipe by Bon Appetit, February 2003, courtesy of Epicurious

For Cake
  • 4 tablespoons unsalted butter, melted
  • 1/3 cup all purpose flour
  • 1/3 cup unsweetened cocoa powder
  • 1/4 teaspoon salt
  • 4 large eggs
  • 3/4 cup sugar
For Mousse Base
  • 1 cup heavy whipping cream
  • 4 cinnamon sticks, broken in half
For Mousse
  • 2/3 cup cherry jam
  • 2 tablespoons kirsch (clear cherry brandy)
  • 4 ounces bittersweet (not unsweetened) or semisweet chocolate, finely chopped
For Glaze
  • 1/2 cup heavy whipping cream
  • 1/4 cup water
  • 2 tablespoons light corn syrup
  • 1 teaspoon chai-spiced tea leaves or Lapsang souchong smoked black tea leaves (from 1 tea bag)
  • 5 ounces bittersweet (not unsweetened) or semisweet chocolate, coarsely chopped
Make Mousse Base

Bring whipping cream and cinnamon sticks just to simmer in heavy medium saucepan. Remove from heat; let steep 1 hour at room temperature. Cover and refrigerate cinnamon cream overnight.

Make Cake


Preheat oven to 400°F. Place 8x8x2-inch heart-shaped cake ring on sheet of foil. Wrap foil up sides of ring. Brush foil and inside of ring with 1 tablespoon butter; dust with flour. Place on baking sheet.

Sift flour, cocoa, and salt into medium bowl. Combine eggs and sugar in large metal bowl. Set bowl over saucepan of simmering water (do not allow bottom of bowl to touch water). Whisk until sugar dissolves, about 2 minutes. Remove from over water. Using electric mixer, beat mixture until thick and billowy and heavy ribbon falls when beaters are lifted, about 5 minutes. Sift half of dry ingredients over; fold in gently. Repeat with remaining dry ingredients. Transfer 1/4 cup batter to small bowl; fold in 3 tablespoons butter. Gently fold butter mixture into batter; do not overmix or batter will deflate. Transfer batter to ring.

Bake cake until tester inserted into center comes out clean, about 20 minutes. Transfer cake with foil to rack; cool completely. (Can be made 1 day ahead. Cover and store at room temperature.)

Make Mousse and Glaze and Assemble Cake

Blend jam and kirsch in small bowl. Cut around sides of cake; lift off ring. Using metal spatula, loosen cake from foil and transfer to rack. Using serrated knife, cut cake horizontally in half. Using tart pan bottom, transfer top cake layer to work surface; turn cut side up. Spread half of jam on cut side of both cake layers.

Strain cinnamon cream into large bowl; beat until soft peaks form. Stir finely chopped chocolate in heavy small saucepan over low heat until smooth. Quickly fold warm chocolate into whipped cream (chocolate must be warm to blend smoothly). Immediately drop mousse by dollops over bottom cake layer; spread to within 3/4 inch of edge. Gently press second layer, jam side down, atop mousse. Smooth sides of cake with offset spatula. Chill assembled cake on rack while preparing glaze.

Bring cream, 1/4 cup water, corn syrup, and tea to boil in small saucepan, stirring constantly. Remove from heat; steep 5 minutes. Strain into another small saucepan; return to boil.

Remove from heat. Add coarsely chopped chocolate; whisk until smooth. Cool glaze until thickened, but still pourable, about 30 minutes. Place rack with cake over baking sheet. Slowly pour glaze over cake to cover, using spatula if necessary to spread evenly. Chill until glaze is firm, at least 2 hours and up to 1 day [during this step, it's a good idea to place the cake in an airtight container. I covered mine with a lid, but the bottom layer dried out a bit because it was still sitting on a cooling rack]. Place cake on platter and serve.

Yield: 1 cake
Estimated Start-to-Finish Time: Not given
Actual Start-to-Finish Time: 3 1/2 hours (not counting chilling time--this is a serious project)

Tuesday, February 9, 2010

Mandarin Pork with Brandy-Infused Hoisin Sauce

MANDARIN PORK WITH BRANDY-INFUSED HOISIN SAUCE

A few posts back, I mentioned that I used to like Susanna Foo's restaurant in downtown Philadelphia. What I did not describe was how much I had to beg and plead to get The Gastronomer to go there with me. When she finally agreed to take me for my 22nd birthday, I eagerly anticipated a wonderful meal prepared by one of America's foremost Chinese chefs. However, as we dug into our appetizers, The Gastronomer couldn't resist raining on my parade with snide comments about "Chinese food for white people" that was five times more expensive but no more delicious than food from her favorite Chinatown haunts. She apologized immediately--she had no intention of tarnishing my birthday meal, but her feelings about how wrong it all was were simply too strong to be denied.

It was fortunate, then, that we ordered the moo shu pork as one of our entrees. When its subtle, perfectly balanced flavors hit our tongues, it was clear that we were experiencing something special--a serious step up from $6 Chinese food. It was truly one of the best dishes I'd ever tasted.

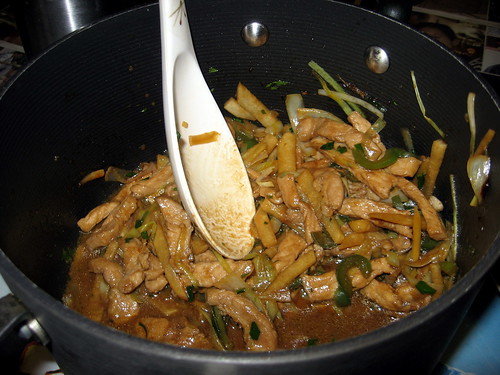
Thus, when I stumbled upon the following recipe in my Susanna Foo Chinese Cuisine cookbook and realized that it was essentially the same as her moo shu pork, I knew I absolutely had to give it a try. As expected, it was amazing. I served it with Susanna's scallion crepes for wrapping. A few months later, The Gastronomer and I made the recipe again using mock meat instead of pork, and it was once again excellent.

Recipe by Susanna Foo Chinese Cuisine

Brandy-Infused Hoisin Sauce
  • 2 tablespoons corn oil
  • 3 garlic cloves, minced
  • 2 cups (16-ounce jar) hoisin sauce
  • 2 tablespoons Asian sesame oil
  • 1/2 cup brandy
  • 2 tablespoons red wine or balsamic vinegar
  • 1/2 cup chicken, pork, or beef stock
Heat the oil in a medium saucepan. Add the garlic and cook over high heat, stirring, until it is golden, about 2 minutes. Be careful not to let the garlic brown.

Add the hoisin sauce and the sesame oil and bring to a boil, stirring constantly. Reduce the heat to medium, add the brandy and vinegar, and cook for 5 minutes, stirring constantly to keep the sauce from sticking to the pan. Add the stock and reduce the heat to low. Cook, stirring occasionally, for 15 minutes, until the sauce is well blended and thickened.

Cool the sauce and pour into a jar with a tight-fitting lid. This sauce will keep well, covered and refrigerated, for up to 1 month.

Mandarin Pork
  • 1/2 pound lean boneless pork loin
  • 1 small leek
  • 2 tablespoons brandy
  • 1 tablespoon soy sauce
  • 1 teaspoon cornstarch
  • 3 tablespoons corn oil
  • 1 tablespoon peeled, julienned gingerroot
  • 1/2 cup thinly sliced red bell pepper
  • 2 jalapeno peppers, cored, seeded, and julienned
  • 3 tablespoons Brandy-Infused Hoision Sauce
  • 1 cup finely julienned jicama
  • 1/4 cup chicken or pork stock
  • 1 tablespoon chopped fresh tarragon leaves
Cover the pork with plastic wrap and place in the freezer for 15 minutes; the semi-frozen meat will be easier to slice and julienne.

Cut off the root end of the leek, and peel off and discard the tough outer green leaves. Cut the leek into 2-inch sections. Cut each section in half lengthwise, the julienne. Wash well in cold water to remove any dirt. Drain and set aside.

Remove the pork from the freezer, cut into 1/8 inch slices, then julienne. Place the julienned pork in a shallow dish.

Combine the brandy and soy sauce in a small bowl. Pour over the pork and mix well. Sprinkle with the cornstarch, and using a fork or chopsticks, mix well to coat. Marinate for 15 minutes.

Heat the oil until it is hot in a large skillet or a wok. Add the pork, along with any marinade, and the gingerroot, and cook over high heat, stirring, for 2 minutes. Add the bell pepper and jalapeno peppers and cook, stirring, for 1 minute. Add the hoisin sauce and cook, stirring, for 2 minutes to coat the meat. Add the leek and the jicama.

Pour the stock into the skillet and cook, stirring, over high heat for 2 to 3 minutes, or until all the ingredients are heated through and the pork is cooked. Mix in the tarragon and serve.

Yield: 4 servings
Estimated Start-to-Finish Time: Not given
Actual Start-to-Finish Time: 1 hour 30 minutes
Substitutions: Susanna recommends using homemade chicken or pork stock, but it didn't seem worth it to me for this dish, so I just used store-brought chicken broth. Her dishes are labor-intensive enough as it is...

Thursday, February 4, 2010

Braised Tofu in Caramel Sauce

BRAISED TOFU IN CARAMEL SAUCE

I absolutely love sweet Chinese sauces, so when The Gastronomer saw this recipe on The New York Times website, she knew it was perfect for me. This was my first foray into caramelizing sugar; unfortunately I haven’t quite mastered it yet. The first time I cooked it a bit too long and the end product tasted slightly burnt, while the second time I was overly conservative and ended up with a sauce that was tasty but ridiculously sweet. It didn’t help that descriptions in the recipe weren’t terribly clear.

Despite my imperfect sauce, we enjoyed the dish and were impressed by how well the tofu soaked up the flavors. The Gastronomer makes caramelizing look so easy when she makes Vietnamese thit kho—I suppose I’ll learn eventually.

Recipe by The New York Times Magazine
  • 1 1-pound block firm tofu
  • 1 cup white sugar
  • 5 shallots, peeled and minced
  • 4 cloves garlic, peeled and minced
  • 2 tablespoons peeled and minced ginger
  • 3 tablespoons soy sauce
  • 1/2 bunch scallions, white and light-green parts only, thinly sliced
  • Freshly ground black pepper
  • Cooked jasmine rice, for serving (optional).
Slice the tofu in half along its length and then each portion into two thick slices. Place the slices between paper towels to drain, replacing towels as needed.

Meanwhile, dissolve the sugar in 1/4 cup water and cook in a small saucepan over medium-low heat until small bubbles begin to appear around the edges of the pan. Carefully swirl the solution, but do not stir. Continue to heat, as bubbles move inward toward the center of the pan [it didn't happen like this when I made it] and the solution turns darker, 20 to 35 minutes, until the syrup has become a deep, golden caramel color. Carefully add 1/2 cup water to this mixture. (It will sputter violently. If some sugar crystallizes at this point, carefully stir the mixture with a metal spoon. The sugar will remelt.) Turn off the heat and allow to cool slightly.

Transfer the caramel sauce to a wide saucepan, turn the heat to medium and add the shallots, cooking for about 2 minutes. Add the garlic and ginger and stir again, cooking for about 1 minute. Now stir in the soy sauce. Simmer and stir until the mixture is viscous and the vegetables are well coated, about 10 minutes.

Place the tofu in the sauce in a single layer and simmer uncovered for 7 minutes. Using a spatula, turn the pieces over. Simmer for 3 or 4 minutes more and then transfer to a warmed platter. Pour the sauce over the tofu and sprinkle with scallions and black pepper. Serve with white rice.

Yield: 4 servings
Estimated start-to-finish time: Not given
Actual start-to-finish time: 1 hour 30 minutes
Substitutions: I used onions instead of shallots and cooked them for 4 minutes instead of 2 to make sure their flavor wasn't too sharp.

Monday, February 1, 2010

Brown Butter Gnocchi with Spinach and Pine Nuts

GNOCCHI WITH SPINACH AND PINE NUTS

Today almost went down in history as the first time I ever managed to get a meal on the table in the published preparation time. This was possible because the majority of the time was allotted for boiling the water and cooking the gnocchi, and there was minimal chopping and other prep work required. Alas, when I looked at the clock after grating some Parmesan over two servings, I had to admit that it had taken me 35 minutes rather than 30. Maybe next time…

This recipe is quite similar to the spaghetti with spinach and anchovies I made back in December, but it has its own charm due to the unique texture and saltiness of the gnocchi. It’s so easy and delicious, I can definitely see myself making it again and again.

Recipe by Cooking Light, January/February 2009
  • 1 (16-ounce) package vacuum-packed gnocchi (if you prefer to make your own, here's an easy recipe)
  • 2 tablespoons butter
  • 2 tablespoons pine nuts
  • 2-3 garlic cloves, minced
  • 1 (10-ounce) package fresh spinach, torn
  • 1/4 teaspoon salt
  • 1/4 teaspoon freshly ground black pepper
  • 1/4 cup (1 ounce) finely grated Parmesan cheese
Cook gnocchi according to package directions, omitting salt and fat; drain.

Heat butter in a large nonstick skillet over medium heat. Add pine nuts to pan; cook 3 minutes or until butter and nuts are lightly browned, stirring constantly. Add garlic to pan; cook 1 minute. Add gnocchi and spinach to pan; cook 1 minute or until spinach wilts, stirring constantly. Stir in salt and pepper. Sprinkle with Parmesan cheese.

Yield: 4 servings
Estimated Start-to-Finish Time: 30 minutes
Actual Start-to-Finish Time: 35 minutes
Substitutions: I didn't bother to tear up the spinach--this saved time, and I didn't feel that the leaves were too big when I was eating it.

Friday, January 29, 2010

Water Chestnut, Arugula, and Endive Salad

WATER CHESTNUT SALAD

Back when I lived in Philadelphia, my aunt learned that I liked Susanna Foo’s restaurant and gave me two of her cookbooks for Christmas. More than two years later, I still had not attempted a recipe from the books—in my inexperienced, cautious state, attempting to replicate the offerings of a high-end Chinese restaurant simply seemed like too intimidating a challenge. Finally this past spring, after building confidence by allowing the America’s Test Kitchen’s chefs to hold my hand through the preparation of a series of three-course meals, I felt ready to attempt a Susanna Foo dinner.

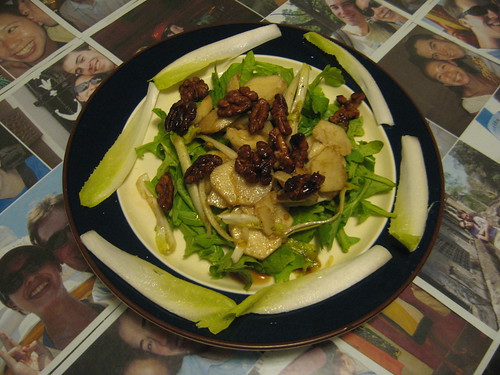
After reading Susanna’s glowing feature on raw fresh water chestnuts, I decided to tackle this salad first. Indeed, the water chestnuts made the dish—they really are something special. If you’ve never tried them, go to a Chinese grocery store and look for small, hard brown fruits covered in dirt. Avoid any that have soft spots, as it means that they are bruised and going bad. Wash them and then peel with a paring knife. They can be stored, peeled, in a bowl of water in the fridge for 1-2 weeks.

The “honeyed” walnuts in this recipe are disproportionately labor intensive. They have a light, crispy texture and unique flavor, and they definitely add to the total package, but you could make a respectable salad with plain old toasted walnuts and save yourself a lot of time.

Recipe by Susanna Foo Chinese Cuisine

“Honeyed” Walnuts
  • 1 pound shelled walnut halves
  • 1 ½ cup sugar
  • About 1 ½ cups water
  • 2 tablespoons corn oil (vegetable oil works fine)
  • Wash the walnuts in lots of running water. Soak them for 10 to 15 minutes in water to cover; drain well.
Fill a large pot with water and bring to a boil. Add the nuts and cook for 10 minutes, or until the water turns dark and the nuts are beige-white in color. Drain and rinse under cool water until the water runs clear; drain.

Bring the sugar and 1 ½ cups water to boil in a medium pot over medium-high heat, stirring to dissolve the sugar. Add the walnuts, reduce the heat to low and stir well with a wooden spoon. Simmer the nuts in the syrup for about 15 minutes, stirring often, until they are well-coated with the syrup. Add ¼ cup hot water if the syrup becomes too sticky. Turn off the heat and let the nuts cool in the syrup for another 10 minutes.

Preheat the oven to 350 degrees F. Strain off the excess syrup and toss the nuts with the oil. Spread the nuts on a large nonstick baking sheet. Bake for 30 to 35 minutes, stirring occasionally, or until they are crisp and dry. If they are not yet crisp, bake them a little longer.

The nuts can be stored in a tightly closed container at room temperature for 1 to 2 days or frozen in a sealed plastic bag for up to 3 months.

Water Chestnut, Arugula, and Endive Salad

For Dressing:
  • 3 tablespoons extra-virgin olive oil
  • 2 tablespoons balsamic vinegar
  • 1 teaspoon peeled, minced gingerroot
  • 1 teaspoon coarse or kosher salt
  • Freshly ground pepper
For Salad:
  • 1 pound fresh water chestnuts, peeled and washed
  • 2 Belgian endives
  • ¼ pound tender baby arugula, stems removed, washed and dried
  • ½ cup “Honeyed” Walnuts (optional; the above recipe will make much more than this)
  • 1 tablespoon minced fresh chervil leaves, for garnish (optional)
Combine all of the ingredients for the vinaigrette and stir well to blend. Set aside.

Cut each water chestnut into thin slices and set aside in a bowl of cold water until needed, to keep them from turning brown.

Cut off the stem end of the Belgian endives. Remove the large outer leaves (you will need 12 of them). Cut each leaf in half lengthwise and place in a large bowl filled with ice water to crisp the leaves. Julienne the remaining smaller inner leaves and immerse them in another bowl of ice water.

Just before serving, drain and dry the water chestnuts and the julienned endive. Place them in a bowl, add the vinaigrette, and mix well.

Place 4 of the halved endive leaves around the perimeter of each of 6 salad plates. Mound some arugula in the center of each plate. Spoon the water chestnut mixture over the top and garnish with the walnuts, if using. Decorate with the chervil leaves, if using.

Yield: 6 servings
Estimated Start-to-Finish Time: Not given
Actual Start-to-Finish Time: 1 hour 45 minutes

Monday, January 25, 2010

Flounder Meuniere with Browned Butter, Lemon, and Capers

FLOUNDER MEUNIERE

The Gastronomer has always been a seafood lover. Recently, however, she has begun to feel that the fish she consumes simply must be raw. Cooked fish is largely flavorless, she complains (crustaceans excepted), and she refuses to order it at restaurants. Fortunately, she is a bit more flexible in the home; when I feel inspired to fry up a simple white fish preparation, she consumes it with a smile. This flounder recipe gets most of its flavor from capers, a fascinating piece of vegetation whose culinary value I have only started to appreciate in the past year.

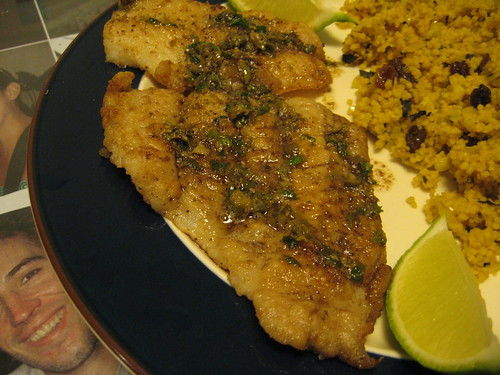
I found it difficult to keep the flour from falling off the fish when flipping it in the pan, so I largely failed to achieve the “golden brown crust” advertised in the recipe. I did, however, manage to cook the fish through without drying it out, and the final product formed a tasty meal served alongside my curried couscous.

Recipe by The America's Test Kitchen Family Cookbook

For Fish
  • 4 large skinless flounder fillets (6 oz each)
  • salt and pepper
  • ½ cup all-purpose flour
  • 2 tablespoons vegetable oil
  • 2 tablespoons unsalted butter
For Sauce
  • 4 tablespoons (1/2 stick) unsalted butter, cut into 4 pieces
  • 2 tablespoons capers, rinsed and minced (you can use a bit more if you’re a fan of capers)
  • 1 tablespoon fresh lemon juice
  • 1 tablespoon minced fresh parsley
  • salt and pepper
  • lemon wedges (for serving)
Cook Fish

Pat the flounder fillets dry with paper towels, then season with salt and pepper. Let the seasoned fish stand until it glistens with moisture, about 5 minutes [I have a feeling that my sloppiness in these initial steps may explain why the flour didn’t stick to my fish very well]. Spread the flour in a shallow dish. Dredge the fish through the flour, shaking off the excess, and transfer to a plate.

Heat 1 tablespoon oil in a 12-inch nonstick skillet over medium-high heat. Add 1 tablespoon of the butter and melt. Gently lay 2 fillets in the pan and cook until golden, about 3 minutes. Turn the fish over (it may be helpful to use 2 spatulas), and cook for about 2 more minutes. If your fillets are smaller than 6 ounces, this time may need to be reduced. Transfer the fish to a plate, and if you’re feeling hardcore, put the plate in 200 degree oven so that the fish will stay warm while the rest of the fillets are cooking. Wipe the skillet clean with paper towels and repeat with the remaining oil, butter, and fish.

Make Sauce

To make the sauce, wipe the skillet clean, then melt 4 tablespoons of butter in it over medium-high heat. Continue to cook the butter, swirling the pan constantly, until it is golden brown and has a nutty aroma, about 90 seconds. Off the heat, stir in the capers, lemon juice, and parsley. Season with salt and pepper to taste. Spoon the sauce over the fish and serve with lemon wedges.

Yield: 4 servings
Estimated Start-to-Finish Time: 30 minutes
Actual Start-to-Finish Time: 1 hour
Substitutions: The original recipe called for sole instead of flounder.

Tuesday, January 19, 2010

Aromatic Curried Couscous

CURRIED COUSCOUS

I'm a big fan of couscous, although I don't cook with it very often. I like the dry texture, kind of like Vietnamese com tam, and the Moroccan seasonings commonly used with it. Thus, when I found this recipe in The America's Test Kitchen Family Cookbook, it seemed like a surefire winner. The bacon spinach salad I served before it was a tough act to follow, but the couscous held its own, displaying a sufficiently complex flavor profile to be enjoyed on its own while complementing my seafood entree nicely. Incidentally, I was informed by the Test Kitchen that couscous is technically not a grain but a pasta. Nevertheless, I am putting it in the "grains" category, as they did in the cookbook, because, well, you can't deny that it tastes and feels like a grain.

Recipe by The America's Test Kitchen Family Cookbook
  • 2 tablespoons extra-virgin olive oil
  • 2 shallots, minced
  • 1 garlic clove, minced
  • 1 teaspoon curry powder (for a little fusion action I used Vietnamese curry powder)
  • 1 1/2 cups low-sodium chicken broth
  • 1/3 cup raisins
  • 1 cup couscous
  • 1/4 cup minced fresh mint
  • 1 tablespoon fresh lime juice
  • salt and pepper
Heat the oil in a saucepan over medium-high heat. Add the shallots and cook until softened, about 2 minutes. Stir in the garlic and curry powder and cook for about 15 seconds, then pour in the chicken broth and add the raisins. Bring to a boil, then stir in the couscous. Remove the pot from the heat and cover it. After 5 minutes, the couscous will be cooked; take off the lid and stir in the mint and lime juice. Season with salt and pepper and serve.

Yield: 4 servings
Estimated Start-to-Finish Time: 15 minutes
Actual Start-to-Finish Time: 30 minutes

Monday, January 4, 2010

Wilted Spinach Salad with Bacon and Red Onion

WILTED SPINACH SALAD WITH BACON

I eat a simple spinach salad nearly every evening to start my dinner, usually topped with apple slices, nuts, and a store-bought vinaigrette. It's quite palatable, but I started the habit more to ensure that I got my daily servings of fruits and vegetables than as a way to tickle my taste buds. The following spinach salad, however, is an entirely different story. It's bloody delicious--eating it is a privilege rather than an obligation. Of course, any time you add a whole package of bacon to a salad you lose any right to call it healthy, but it's definitely worth making nonetheless. It turns out a dressing made from bacon fat is a pretty good idea.

Recipe by The America's Test Kitchen Family Cookbook
  • 10 oz. baby spinach (flat-leaf)
  • 10 oz. bacon (10 slices), chopped fine
  • 2 tablespoons extra-virgin olive oil
  • 1 red onion, minced
  • 2 garlic cloves, minced
  • 1 teaspoon sugar
  • 1/2 teaspoon salt
  • 1/2 teaspoon pepper
  • 6 tablespoons cider vinegar
  • 3 hard-boiled eggs, peeled and quartered
Place the spinach in a large bowl. Fry the bacon in a large skillet over medium heat until crisp, about 5 minutes. Transfer the bacon to a paper-towel lined plate and pour off all but 4 tablespoons of the fat. I recommend saving the extra fat in the refrigerator for another use--for instance, it makes for some damn-good cornbread. Add the olive oil to the bacon fat in the skillet and return to medium heat. Add the onion, garlic, sugar, salt, and pepper and cook until the onion is soft, about 3 minutes. Off the heat, stir in the vinegar, then pour immediately over the spinach and toss to wilt. It is important to perform this step quickly, while the dressing is still hot, to achieve the optimal texture of the spinach. Portion the salad onto individual plates and garnish with the bacon and hard-boiled eggs.

Yield: 4-6 servings
Estimated Start-to-Finish Time: 30 minutes
Actual Start-to-Finish Time: 45 minutes
Related Posts with Thumbnails