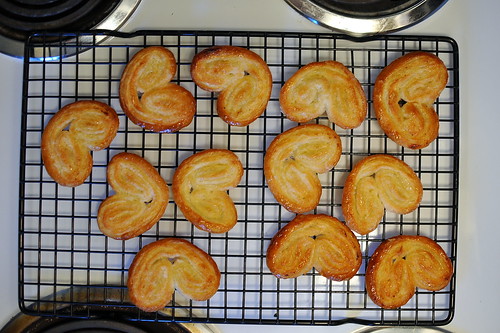
Tuesday, April 2, 2013

Spicy Baked Pasta with Bacon

Spicy Baked Pasta with Bacon

Several years ago, The Gastronomer went through a baked pasta phase, during which she came up with a number of fantastic variations on the winning formula of a sturdy pasta baked with a white, cheesy sauce and vegetables.  I've recently renewed the tradition with the version presented below, which is currently far and away The Gastronomer's favorite thing to eat for lunch at work.  Between the prep work, sautéing, sauce-making, baking, and inevitable scrubbing when the béchamel burns on the bottom of the pan [not sure why this keeps happening to me--seems like the only way to avoid it is to not quite let the milk boil...], the recipe takes a decent amount of work, but it's worth it because it will feed your family for a week (at least, it will if your family only has two people like ours does, and one of the people only eats the dish once...).  It strikes a great balance between healthy and rich, with plenty of flavor and spice.

Recipe adapted from "Two Pepper Rigatoni and Cheese" by Cooking Light, accessed via myrecipes.com.
  • 16 ounces uncooked whole wheat pasta (rigatoni, penne, or similar)
  • 8 ounces bacon (6 strips), sliced into 1/2" pieces
  • 1 medium white or brown onion, chopped
  • 10-12 ounces fresh spinach
  • 8 ounces frozen peas
  • 3 tablespoons all-purpose flour
  • 3 cups 1% milk
  • 1 cup (4 ounces) shredded jalapeno jack cheese 
  • 1 cup (4 ounces) shredded sharp cheddar cheese
  • 3-4 Thai chilis (or 2 jalapeno peppers), minced
  • 3/4 teaspoon salt
  • 1 tablespoon butter
  • 1 cup Panko breadcrumbs
Preheat oven to 375°.  Cook pasta in salted water until al dente, 1-2 minutes less than stated on package directions. Drain well; place in a large bowl.

Sauté bacon over medium-high heat until cooked through and slightly crisp.  Use a slotted spoon to transfer the bacon to the bowl with the cooked pasta.  Discard most of the bacon grease, saving approximately 1 tablespoon in the skillet for sautéing the onion.  Add the onion and cook over medium heat until it is tender and tastes mild and sweet.  Turn down heat and add spinach in bunches to the pan, stirring until it has cooked down.  Stir in frozen peas.  Transfer contents of skillet to the bowl with the pasta.

Spoon flour into a saucepan. Gradually add milk, stirring with a whisk until smooth. Bring to a boil; cook 2 minutes or until thickened, stirring constantly [as mentioned above, I've found that the milk/flour mixture always burns on the bottom of the pan during this step, even if I stir constantly with a whisk.  This doesn't affect the quality of the sauce, but cleanup is a pain.  Turning off the heat just before the milk boils helps, but I'll keep searching for other remedies.  Maybe our electric stove just adds heat too fast, or maybe it would be better to add butter like in a standard béchamel ...].  Remove milk from heat and add cheeses, stirring until cheeses melt and mixture is smooth. Stir in chilis and salt. Add cheese mixture to pasta, tossing well to coat.  Spoon pasta mixture into a 13 x 9–inch baking dish.

Melt butter in a small bowl. Add Panko breadcrumbs and toss until blended. Sprinkle breadcrumb mixture over pasta mixture. Bake at 375° for 15 minutes or until breadcrumb topping is golden brown.

Yield: 6 to 8 servings
Estimated Start-to-Finish Time: 40 minutes
Actual Start-to-Finish Time: 1 hour 45 minutes
Substitutions: There are many possible modifications one could make to this recipe.  We've tried several different cheese combos  (parmesan, fontina, etc.) with great success and used a number of different vegetables as well.  Most vegetables should be sautéed until they are tender before baking.  Homemade breadcrumbs can be used instead of Panko by following the original Cooking Light recipe.

Sunday, July 29, 2012

Mexican Chocolate Tofu Pudding

Mexican Chocolate Tofu Pudding

The Gastronomer emailed me this Mark Bittman recipe a full three years ago; when she requested a special dessert this weekend, I remembered it and decided it was pudding time! It's pretty cool: you start out with a block of soft tofu and some melted chocolate, add a few spices, blend it all up, and after chilling in the refrigerator for a bit, the result is a silky smooth pudding that I would have sworn was made with cream and eggs like this one.  I'm usually not that into chocolate, but I do love desserts with a spicy kick.  A few spoonfuls of pudding made for an extremely satisfying conclusion to my dinner tonight.

For another creative use of tofu, check out this pesto recipe.

Recipe by Mark Bittman, published in The New York Times.
  • 3/4 cup sugar
  • 1 pound silken tofu
  • 8 ounces high-quality bittersweet or semisweet chocolate, melted in a double broiler
  • 1 teaspoon vanilla extract
  • 1 1/2 teaspoons ground cinnamon
  • 1/2 teaspoon chili powder / cayenne pepper, or more to taste
  • Chocolate shavings (optional)
In a small pot, combine sugar with 3/4 cup water; bring to a boil and cook until sugar is dissolved, stirring occasionally. Cool slightly.  Put all ingredients except for chocolate shavings in a blender and purée until completely smooth, stopping machine to scrape down its sides if necessary. Divide among 4 to 6 ramekins and chill for at least 30 minutes. If you like, garnish with chocolate shavings before serving [I used white chocolate for visual contrast].

Yield: 4 to 8 servings, depending on how much chocolate you can handle in one sitting
Estimated Start-to-Finish Time: 40 minutes (including 30 minutes chilling time)
Actual Start-to-Finish Time: 1 hour (including 30 minutes chilling time).  I spent a significant fraction of this time figuring out how to melt the chocolate.  The second time around it will be a good deal quicker.
Substitutions: I was a bit unsure of what Bittman meant by "chili powder".  The chili powder in our spice cabinet is the type used to make chili (the chunky bean and meat stew)--it contains garlic and several other ingredients in addition to hot peppers.  I thought this would probably be an odd flavor profile to add to a dessert, so I used cayenne pepper instead.  Half a teaspoon made the pudding plenty spicy.

Monday, May 21, 2012

Thai Basil Pesto

Thai Basil Pesto

I'm stoked to report that The Gastronomer and I have added Thai basil to our potted herb garden this year, and the two small plants I purchased in March are thriving.  In fact, they've been growing so fast that even with a big pot of Ba Ngoai's pho in the house last week, our demand for the fragrant leaves hasn't been able to keep up.  I've grown tired of wasting perfectly good Thai basil when I trim off the parts that are flowering, so I decided it was time to make pesto.  This recipe is a delicious twist on a classic pesto, with fish sauce, sesame oil, peanuts, rice wine vinegar, and red pepper flakes giving it a distinctly Southeast Asian flavor profile.  It was surprisingly spicy for a Cooking Light recipe, I thought.  We enjoyed it with Vietnamese rice vermicelli noodles (bun) and vegetables.

Recipe from Cooking Light via myrecipes.com.
  • 2 cups fresh Thai basil leaves
  • 3-4 tablespoons dry-roasted peanuts
  • 1 tablespoon sugar
  • 1 1/2 tablespoons dark sesame oil
  • 1 tablespoon fish sauce
  • 1 tablespoon rice wine vinegar
  • 1 teaspoon crushed red pepper
  • 2 garlic cloves
Place all of the ingredients in a food processor; process until smooth.  Toss with noodles and serve immediately, or transfer to a bowl, press plastic wrap onto the surface of the pesto, and store in the refrigerator up to one week.

Yield: 4-6 servings
Estimated Start-to-Finish Time:
Actual Start-to-Finish Time: 45 minutes (mostly trimming the basil, plucking the leaves from the stems, and washing them).
Substitutions: At the suggestion of a commenter on myrecipes.com, I added extra peanuts (the original recipe only called for 2 tablespoons).  After making my way through half a bowl of noodles with the pesto, I decided that it was actually too spicy--I think I'll reduce the red pepper to 1/2-3/4 teaspoon next time.

Sunday, March 25, 2012

Tuna with Angel Hair Pasta

Tuna with Angel Hair Pasta

The Gastronomer and I have been living a mere 10 minute drive from a Mitsuwa Marketplace for more than three years now, but we didn't start paying it regular visits until last month.  I guess we thought the only worthwhile Mitsuwa was the Torrance location, with its dynamite food court.  Well, it turns out the appeal of Mitsuwas extends beyond ramen and curry.  We've recently been enjoying amazing Sumo citrus fruits, and last week The Gastronomer made inari sushi at home.  In light of these successes, I felt like it was time to finally try out a recipe from our Nobu West cookbook.  Like most cookbooks from fancy restaurants, the Nobu book initially struck me as fairly intimidating, although it was more the shopping than the cooking itself that had me hesitating.  Nobu's recipes tend to be surprisingly simple, so the quality of ingredients is undoubtedly paramount in achieving the desired product.  I don't know much about picking out fish, but I felt like I couldn't go wrong at Mitsuwa.

For this simple twist on a Japanese noodle dish, I picked out two pre-packaged fresh tuna fillets from Spain, on sale for $22.99 per pound.  I've never spent this much for fish in the grocery store before, but it was worth it, as the quality turned out to be comparable to what we would expect from a nice sushi restaurant.  I do believe this was one of The Gastronomer's favorite things that I've ever made.

Recipe adapted from Nobu West by Nobu Matsuhisa and Mark Edwards. 
  • 3 ounces angel hair pasta (capelli d'angelo)
  • salt
  • 5 ounces boneless, skinless fresh tuna
  • 1 tablespoon toasted sesame oil
  • 1 tablespoon olive oil
  • 1 teaspoon chili-garlic sauce [I used Lee Kum Kee brand]
  • 1.5 tablespoons soy sauce
  • 1/4 bunch of chives, finely snipped
Cook the angel hair pasta in plenty of salted, boiling water until just al dente.  Drain and refresh in cold water, then drain well again.  Following the grain of the tuna, slice it into long strips as thin as you can manage (~1/8 inch).  Combine with the drained pasta in a mixing bowl.  Add the sesame and olive oils and gently mix again.  Add the chili-garlic sauce to the soy sauce and gently mix into the salad, taste, and add a little more salt if required.  Place on a serving dish and sprinkle with the chives.

Yield: 2 servings (Nobu says that this recipe serves 4, but that would be very small portions--I ended up doubling the recipe so that we would have leftovers).
Estimated Start-to-Finish time: Not given
Actual Start-to-Finish time: 35 minutes (could have been about 20 if I had been a bit more confident cutting the fish).
Substitutions:  The original recipe called for 2 tablespoons sesame oil, 2 tablespoons olive oil, 2 tablespoons soy sauce, and 1/2 bunch of chives, but these amounts seemed excessive.  I used the quantities listed above, and The Gastronomer and I felt that the dish was plenty oily and salty.

Friday, March 9, 2012

Mustard Batons

Mustard Batons

As a prequel to the Savannah banana pie that I served for dessert on The Gastronomer's recent birthday, I prepared a four-course meal from Dorie Greenspan's Around My French Table.  Greenspan's cookbooks are an internet sensation, but I chose her book of French-inspired recipes for this important cooking project mostly because of how much I enjoyed beggar's linguine, the first recipe that The Gastronomer prepared from Around My French Table earlier this year. Mustard batons were an obvious choice for an appetizer because The Gastronomer had just made a large quantity of gourmet mustard from scratch.  Plus there is nothing that makes me feel more at home in the kitchen than a recipe that requires one to make precise measurements with a ruler.  This is also a perfect recipe to serve as a hors d'oeuvre preceding a multi-course meal because the batons can be prepared ahead of time and frozen, then baked at the last minute.

Although the recipe couldn't be simpler, I found forming the batons to be a little tricky because I had to roll the puff pastry very thin in order to make a rectangle of the suggested dimensions. This led to some breakage when folding the dough in half.  It didn't help that my puff pastry sheet had been hanging out in the freezer a year or so too long and had some crusty corners.  However, The Gastronomer believes there is nothing more noble than using up old ingredients rather than letting them go to waste, so I knew she would appreciate my efforts.  I threw away the bad parts and proceeded with a smaller batch of batons, and the results were quite appealing.  The Gastronomer loved them, although how could she have not when they were made with her mustard?

Recipe from Around My French Table by Dorie Greenspan.
  • 2 sheets frozen puff pastry (each about 8 1/2 ounces), thawed
  • All-purpose flour, for rolling
  • 1/2 cup Dijon mustard [or other mustard]
  • 1 large egg
  • Poppy seeds, for topping (optional)
Position the racks to divide the oven into thirds and preheat the oven to 400 degrees F.  Line two baking sheets with silicone baking mats or parchment paper.  Have a ruler and a pizza cutter (or sharp knife) at hand.

Working with one sheet of pastry at a time, roll the dough out on a lightly floured surface until you have a rectangle that's about 12 x 16 inches.  If necessary, turn the dough so that a short side of the rectangle is closest to you.  Measure the length so that you can find the middle, and spread 1/4 cup of the mustard over the lower half of the dough, stopping about 1/8 inch from the side and bottom edges.  Fold the top portion of the dough over the bottom and cut the pastry from top to bottom into strips about 1 inch wide, then cut the strips crosswise in half (if you prefer, you can leave the strips long).  Carefully transfer the batons to one of the baking sheets and chill or freeze them while you work on the second batch (you can make all the strips to this point and freeze them on baking sheets, then pack them airtight and keep them frozen for up to two months).

Lightly beat the egg with a splash of cold water and brush just the tops of the strips with this glaze.  If you'd like, sprinkle them with poppy seeds.  Bake the batons for 8 minutes.  Rotate the sheet from front to back and top to bottom and bake for another 7 to 8 minutes, or until the strips are puffed and golden brown.  Remove the baking sheets from the oven and let the batons rest for a couple of minutes before serving.

Yield: 40 batons
Estimated Start-to-Finish Time: Not Given
Actual Start-to-Finish Time: 45 minutes
Substitutions: I only made a half a batch (using a single sheet of puff pastry)--I recommend this if you're only serving a small number of people, since the batons are best when they're still warm and crisp from the oven.
Related Posts with Thumbnails