I'm an experienced baker of cookies, cakes, and the like, but the thought of making a pie has always been a bit intimidating to me. It took a very special occasion,
The Gastonomer's 30th birthday, to inspire me to finally attempt my first pie without my mother's assistance. I flipped through
Maida Heatter's book of Pies and Tarts, pondering my options: peach or berry pie (awesome but out of season), apple pie (delicious and classic, but kind of boring), key lime pie (mmm... but choosing a simple graham cracker crust would be shying away from the true challenges of pie crust baking), ... When I saw this recipe, I knew it was perfect. It didn't have a flaky crust, but bananas, toffee, and caramel are among The Gastronomer's very favorite things in this world.
Heatter claims that this pie "has several parts to it--all easy and fun--but they do take time." Nevertheless, there were definitely some technical steps. Her directions are extremely detailed and clear, but somehow things still went awry. I could tell as soon as I started pressing my crumb crust into the pan that it was way too buttery--my hands became very greasy as I worked with it, and when I brought it out of the oven after the recommended 8 minutes of baking, it was bubbling madly. I think the fresh Amaretto cookies that I bought from
Whole Foods might have been to blame; Heatter recommends pre-packaged cookies by
Lazzaroni. This wasn't a disaster--I put it back in the oven for 2-3 more minutes and it seemed like everything was going to work out.
However, I ran into more serious trouble when I tried to carry out Heatter's clever procedure for keeping the crust from sticking to the pan (which involves baking the crust with a layer of aluminum foil under it, then freezing it in the pan and removing the foil while the crust is rock hard). The excess butter seeped through the foil and froze, cementing the foil to the pie pan and to the crust. I was far worse off than if I hadn't used foil at all. After several frantic minutes filled with various desperate schemes to get the pie to come loose, I finally succeeded in heating up the bottom of the pie plate enough that the frozen butter melted and I was able to pry the crust out of the pan with only minimal damage. I then faced another daunting challenge in scraping the sticky foil off the bottom of the crust--a task I delayed for a few minutes by putting the crust back in the freezer to harden up again. I ultimately did get the foil off and the crust back in the pan mostly intact, save for a few crumbled spots around the edges, and the rest of the recipe went smoothly (incidentally, I attempted Heatter's aluminum foil trick again the next time I tried making a crumb crust, and it worked great, so I don't hold her at fault--I really just think the cookies I used were a bit different than what she had intended for this recipe).
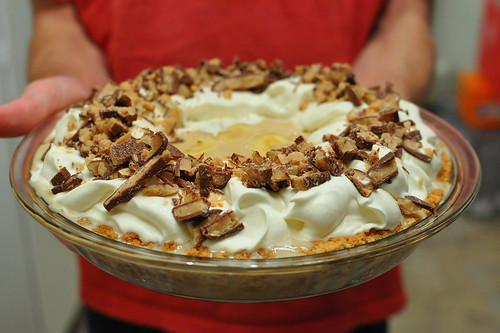
The pie came together and actually looked pretty good in the end, and The Gastronomer was thrilled to be presented with a "birthday cake" that contained so many of her favorite ingredients. Unfortunately, the pie had a tragic flaw which, ironically, had nothing to do with the crust. I had presumed that the caramel filling would thicken and set when the pie was chilled, but this did not happen even after many hours in the refrigerator. The final product was sadly more like a banana caramel soup than a pie. The Gastronomer reported that it was delicious on the first and second days. However, it was far too large (and unhealthy) a pie to finish that fast, and by later in the week the runny filling caused the crust to disintegrate. While we were left with a soggy mess in the end, I enjoyed my first pie-making experience enough that I returned to Heatter's book to try again (with a different recipe) a few weeks later.
Recipe from
Maida Heatter's Pies and Tarts.
For Macaroon Crust
For Filling
- 1 14-ounce can sweetened condensed milk
- 3 to 4 ripe but not overripe bananas
For Whipped Cream Topping
- About 3 ounces Almond Roca, English toffee candies, or Heath Bars
- 1 1/2 cups whipping cream
- 2 tablespoons confectioners sugar
- 1/2 teaspoon vanilla extract
- 1 or 2 drops (only) almond extract
Make Macaroon Crust
Adjust a rack to the middle of the oven and preheat oven to 375 degrees. Break up the macaroons, then process them in the food processor until they become crumbs. Add the melted butter and process to mix. Turn a 9-inch glass pie plate upside down on a work surface, and press a 12-inch square of aluminum foil over the back of it, shiny side down. Turn the pie plate back over and place the shaped foil into the plate. Press the foil firmly into place in the plate with a potholder or folded towel. Fold the edges of the foil down over the rim of the plate.
Turn the crumb mixture into the foil-lined plate. Using your fingertips, distribute the mixture evenly and loosely over the sides first and then the bottom. Then press the crust firmly and evenly on the sides, pushing it up from the bottom a bit to form a rim slightly higher than the edge of the pie plate. Be careful that the top of the crust is not too thin. After pressing the sides and the top edge firmly, press then remaining crumbs evenly and firmly over the bottom. There should be no loose crumbs.
Bake for 10 minutes. Then cool to room temperature. Freeze the crust in the pie plate for at least 1 hour, overnight if possible. It must be frozen solid. Remove from the freezer. Raise the edges of the foil and carefully lift the foil (with the crust) from the plate. Gently peel away the foil as follows: Support the bottom of the crust on your left hand and peel away the foil, a bit at a time (do not tear the foil) with your right hand. As you do so, rotate the crust gently on your left hand.
Supporting the bottom of the crust with a small metal spatula or a table knife, ease it back into the plate very gently in order not to crack it. It will not crack or crumble if it has been frozen long enough. [note that at this point I slide the pie crust onto a flat dinner plate instead and put it back in the freezer, because I needed to use my only glass pie plate for the next step.]
Make Filling
Adjust a rack to the middle of the oven and preheat oven to 425 degrees. Pour the condensed milk into an 8- or 9-inch Pyrex pie plate. Cover it airtight with aluminum foil, pressing the edges over the rim of the plate to seal. Place the plate in a large shallow pan. Pour hot water about 1/2 inch deep into the large pan and back for 1 hour and 20 to 30 minutes. The condensed milk will bake to a rich caramel color. During baking, add more water to the large pan if necessary. Remove the pie plate from the larger pan, then remove the foil covering and set the caramel aside to cool completely.
From 4 to 8 hours before serving, peel the bananas and cut them crosswise into 1/4 inch slices. Do the cutting over the crust and let the slices fall into the crust. Flatten the layer of bananas a bit. With a teaspoon, place small spoonfuls of the cooled caramelized milk all over the bananas (if you place too much in any one spot you will not have enough to go around). Then, with the back of a spoon, smooth the top a bit to voer the bananas completely. Refrigerate for 4-8 hours.
Make Whipped Cream Topping and Assemble Pie
Unwrap the candy and on a cutting board cut down on the candy bars with a small sharp knife to slice the candy thin. Set it aside.
In a small chilled bowl with chilled beaters whip the cream with the sugar and vanilla and almond extracts only until the cream holds a definite shape but not until it is really stiff. Place the cream by tablespoonfuls in a circle around the rim of the pie--do not cover the middle of the filling.
Sprinkle the candy over the whipped cream. Refrigerate and serve very cold.
Yield: 8 servings
Estimated Start-to-Finish Time: Not given
Actual Start-to-Finish Time: 8 hours [I usually leave out chilling time in calculating this, but in this case I was cooking several other dishes at the same time, and I really have no idea how much "active time" there was. In any case, you'll need to start the recipe at least 8 hours before serving it, and making the crust the night before would be ideal].


