I saved the most traumatic cooking experience of the year for December. It had come time to use the fruits from the young dwarf Meyer lemon tree that the Gastronomer and I have been lovingly caring for since March, and I wanted to make something special. I picked out this recipe from among the La Times' "100 things to do with a Meyer lemon". It sounded right up our alley, and yet different than anything I had ever made before. Our little tree only bore 8.3 smallish lemons this year (1 tiny runt lemon = 0.3 smallish lemons), and I would be using 5.3 of them on this evening, so I really wanted it to turn out well. Unfortunately, the instructions for "quick-preserving" the lemon peels got me quite confused. The recipe said to:
"Return the drained peel to the pan, add the reserved juice, salt and sugar and bring to a boil. Reduce the heat and simmer for 10 minutes. Remove from the heat and set aside to cool. Makes about three-eighths cup."
I presumed that this meant that the mixture of the liquid plus peels was supposed to have reduced to a volume of 3/8 cup. This clearly had not happened after 10 minutes. Having previously experienced that most recipes involving reduction underestimate the amount of time it will take, I continued cooking the peels, ultimately leaving them on the stove for a good 30 minutes. It was only then I realized that using the liquid as part of the sauce could not possibly be the right approach--I put 1/4 cup of salt in there for goodness sakes! Perhaps this would have been obvious to someone who had made traditional preserved lemons before, but it obviously wasn't spelled out clearly enough for me. I took the pot off the stove. I had accomplished my original goal of getting rid of most of the liquid, but what was left was a gloopy mess. The quick-preserved peels were worlds away from the ideal texture and far too salty. I did my best to salvage things by straining what liquid I could out of them, but still feared that I had wasted our precious fruits and would soon be ruining a perfectly good pound of shrimp. I cautiously added less than half of the peels to the marinade mixture and carried on.
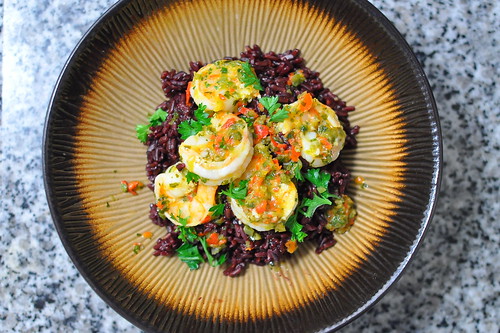
Thankfully, this story has a happy ending. I couldn't julienne the peels and garnish the dish with them as instructed, but the end product actually tasted really good! Amazing, even. The shrimp were oh so tasty, and the sauce was not ridiculously salty--it seemed that I had guessed right in the amount of preserved peel I added. I hadn't been sure how much I would like the black rice, but it went together perfectly with the shrimp. This is a really great recipe--every bit as good as it sounded on paper--although there were a couple of additional steps that should have been written more clearly. I'm looking forward to trying it again and really getting everything right.
Recipe adapted from Marcus Samuelsson's The Soul of a New Cuisine by the Los Angeles Times.
For Quick-Preserved Meyer Lemon Peels
- 6 Meyer lemons
- 1/4 cup kosher salt
- 1/4 cup sugar
For Shrimp Piri Piri
- 1 cup black rice (Forbidden rice) [when uncooked, this looks similar to wild rice, but they are actually quite different]
- 4 red jalapeño chiles, seeded, ribs removed and chopped [after Whole Foods let me down, I surprisingly found these at Ralphs]
- 2 green jalapeño chiles, seeded, ribs removed and chopped
- 2 serrano chiles, seeded, ribs removed and chopped
- 2 cloves garlic
- 1/4 cup chopped cilantro, plus additional for garnish
- 1/4 cup chopped Italian parsley
- Juice of 1 Meyer lemon
- 1 recipe quick-preserved Meyer lemon peel, julienned, divided
- 1/2 cup plus 2 tablespoons olive oil, divided
- 1 pound medium shrimp, tail-on, peeled and deveined
- 1/4 teaspoon kosher salt
- Additional chopped cilantro for garnish
Make Quick-Preserved Meyer Lemon Peels
Place the peel and 2 cups of water in a saucepan and bring to a rolling boil. Drain. Repeat this procedure once more. Return the drained peel to the pan, add the reserved juice/water mixture, salt and sugar and bring to a boil. Reduce the heat and simmer for 10 minutes. Remove from the heat and set aside. When cool, the pieces of peel can be scooped out of the liquid with a slotted spoon. You should end up with about 3/8 cup of "preserved" peel.
Make Shrimp Piri Piri
In a medium saucepan with a tight-fitting lid, cook the black rice according to the package instructions (about 30 minutes) and reserve.
In a food processor, combine the chiles, garlic, cilantro, parsley, lemon juice and 1/8 cup of the preserved lemon peel and process until the mixture is a coarse paste. Add 1/2 cup olive oil in a slow stream and reserve. (Makes 1 cup.)
In a large bowl, toss the shrimp in the sauce and allow to marinate, covered and refrigerated, for 30 minutes.
Heat the remaining 2 tablespoons olive oil in a large skillet over high heat until it shimmers, then add the marinated shrimp [I'm not sure what the intention was in the original recipe, but I poured in all of the marinade as well and was glad I did--it made a terrific sauce to pour over the rice at the end]. Toss for 3 to 4 minutes until the shrimp is opaque, taking care not to overcook. Season with kosher salt.
Serve the shrimp over the black rice, garnished with the remaining preserved lemon and a little chopped cilantro.
Yield: 4 servings
Estimated Start-to-Finish Time: 1 hour 20 minutes
Actual Start-to-Finish Time: 2 hours 40 minutes
Substitutions: I went ahead and took the tails off the shrimp before marinating and cooking--this made the end product easier to eat, if perhaps slightly less attractive. I also reduced the amount of olive oil to about 1/3 cup to make the recipe a bit less fatty; this still produced a marinade/sauce with an ideal consistency.